


“Setting up an Outlook email signature should be a breeze,” you might think. And you’d be absolutely right. It should. But it’s not. With all the different Outlook apps and services around, it can actually be quite confusing. Even if you check out the latest how-to and step-by-step articles or investigate the matter with your AI agent, it’s not guaranteed that you’ll avoid all the hurdles lying in wait.
That’s why we’ve created this no-sweat guide to email signatures for Outlook. Our goal here is to collect only the absolutely essential information on how you can create your signature in different Outlook versions, as well as to show you how to quickly generate your signature template using an online generator. Follow our tips and you’ll be all set in a minute. Then, you can use the extra time to read the other few sections, where we discuss key signature elements and share a few great examples of professional email signatures for Outlook (and other email apps).
How do I set up a signature in Outlook
Let’s cut to the chase. Simply choose your Outlook version and learn how to add your email signature in:
- Classic Outlook for Windows
- New Outlook for Windows
- Outlook for Mac
- Outlook on the web (OWA)
- Outlook for Android
- Outlook for iOS
Classic Outlook for Windows
- Open Outlook and click New Email.
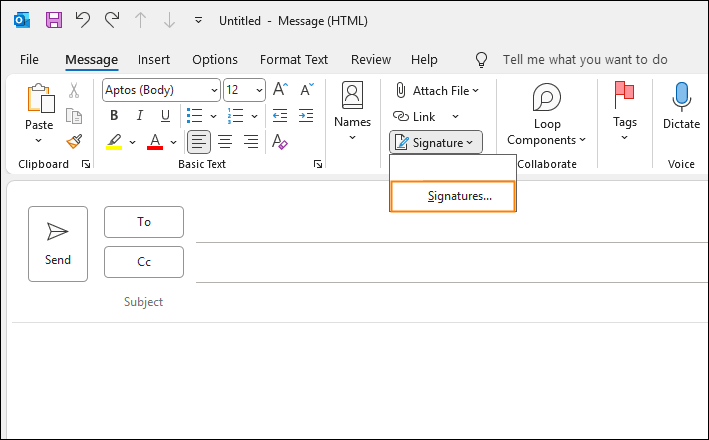
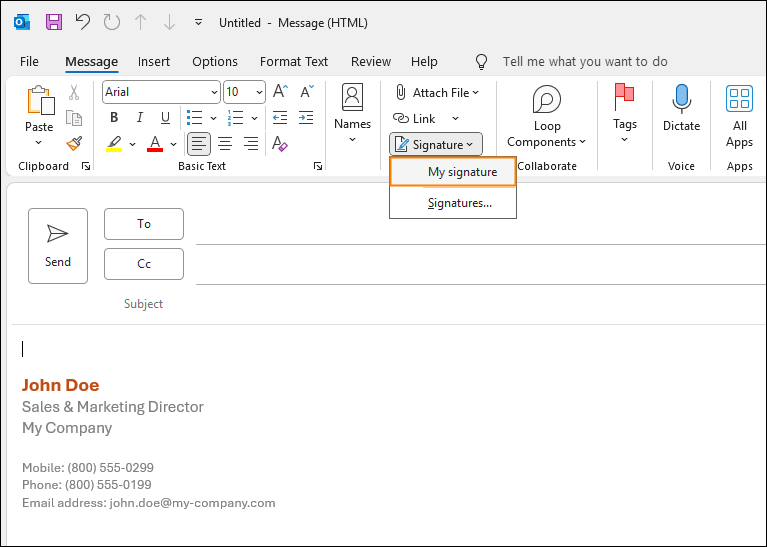
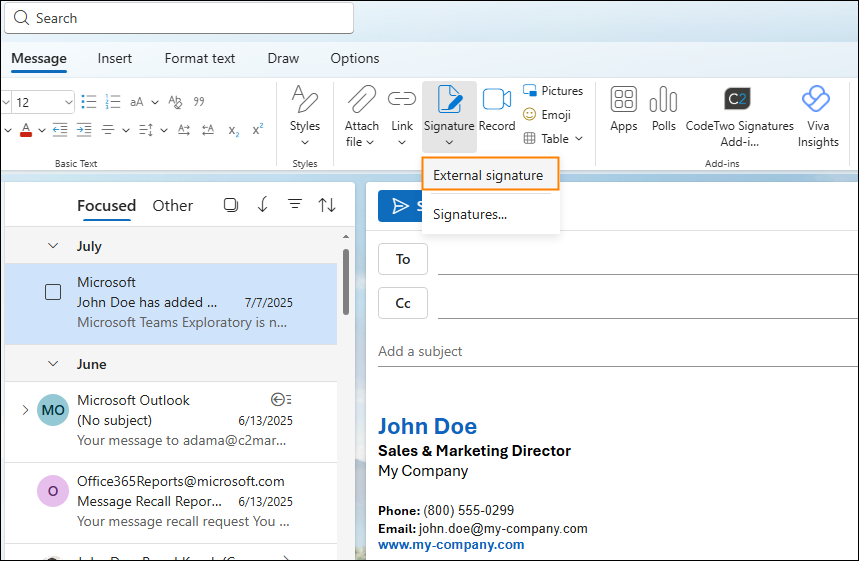
- On the ribbon of the new message window, click Signature > Signatures.
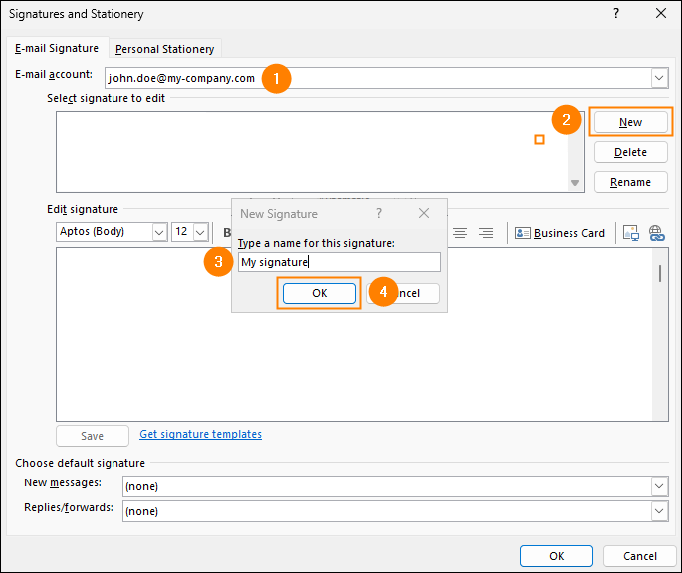
- In the Signatures and Stationery window that opens, specify an email account that should get the new signature and click New. Next, type a name for your signature and click OK.
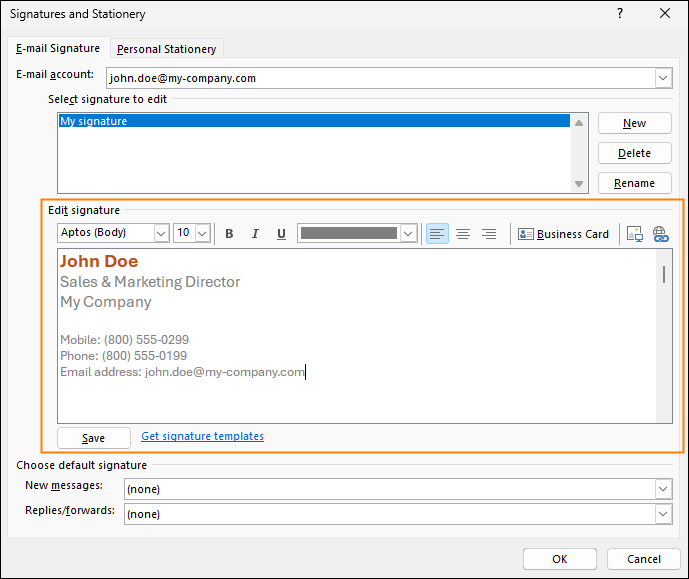
- In the Edit signature section, create your signature block using the available formatting tools.
Need more tools or a ready-to-use signature template? Check out our free email signature generator.
- In the Choose default signature section, you can specify if you want to add the signature by default to new messages and/or replies and forwards.

- Click OK to save changes.
- To check if the signature works correctly, open a new email message. The signature should already be there if you have set it as default. Otherwise, select the Signature button on the ribbon and choose your new signature to insert it into the message.
Learn more about creating email signatures in classic Outlook for Windows
New Outlook for Windows
- Open Outlook and click New (or New mail, if you use the simplified ribbon).
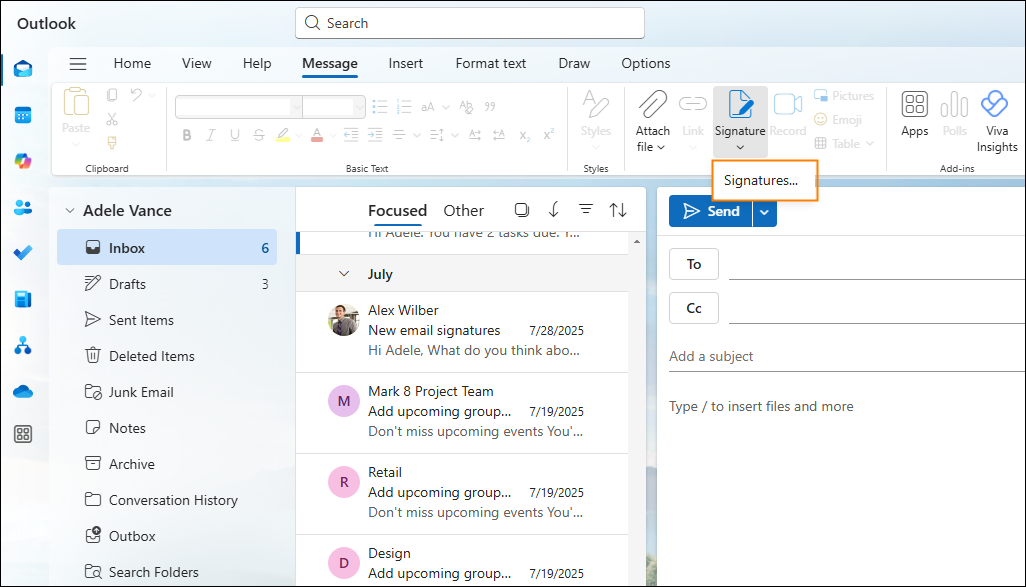
- Click Signature > Signatures on the ribbon of the new message window.
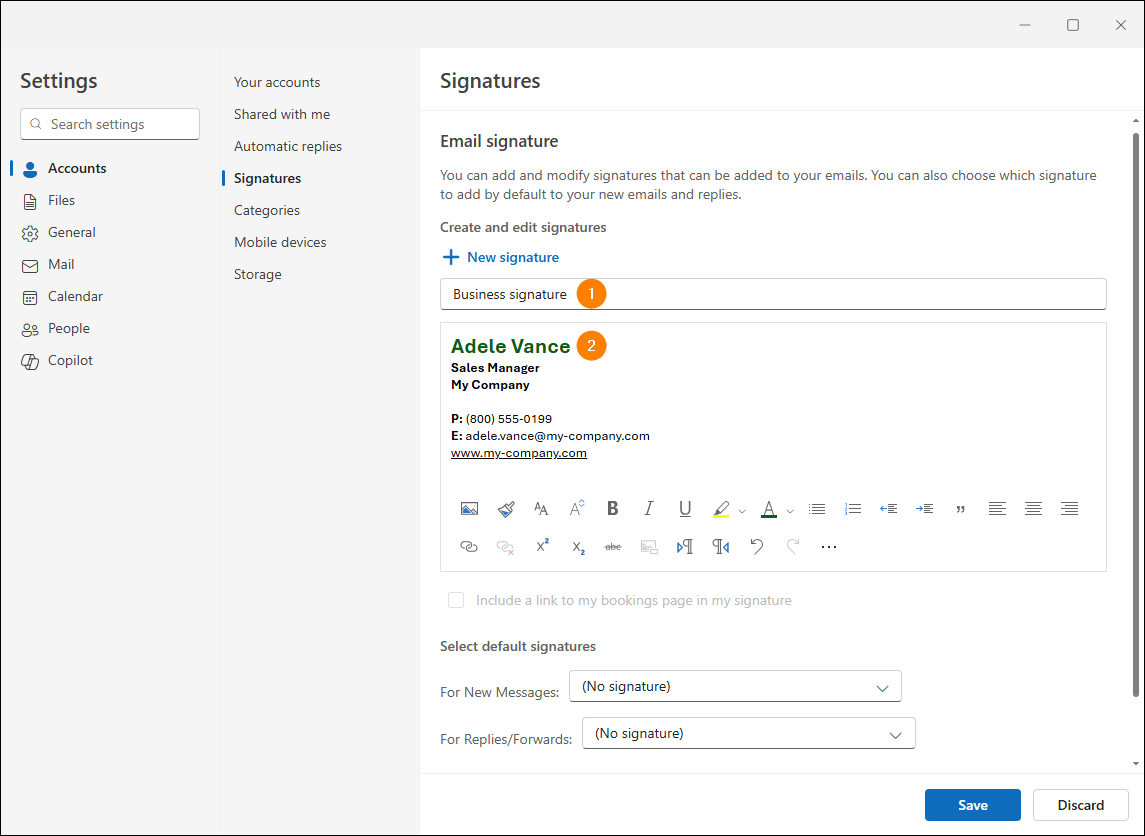
- In the Signatures section of the Settings window that opens, type a name for your signature in the Edit signature name field. Next, switch to the text field below to create your signature block using the available formatting tools.
Need more tools or a ready-to-use signature template? Check out our free email signature generator.
- Click Save to save changes.
- In the Select default signatures section, you can specify if you want to add the signature by default to new messages and/or replies and forwards. Then, click Save again.
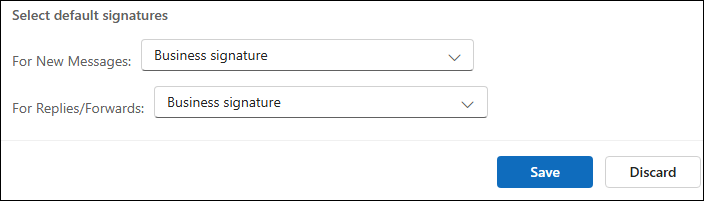
- To check if the signature works correctly, open a new email message. The signature should already be there if you have set it as default. Otherwise, select the Signature button on the ribbon and choose your new signature to insert it into the message.
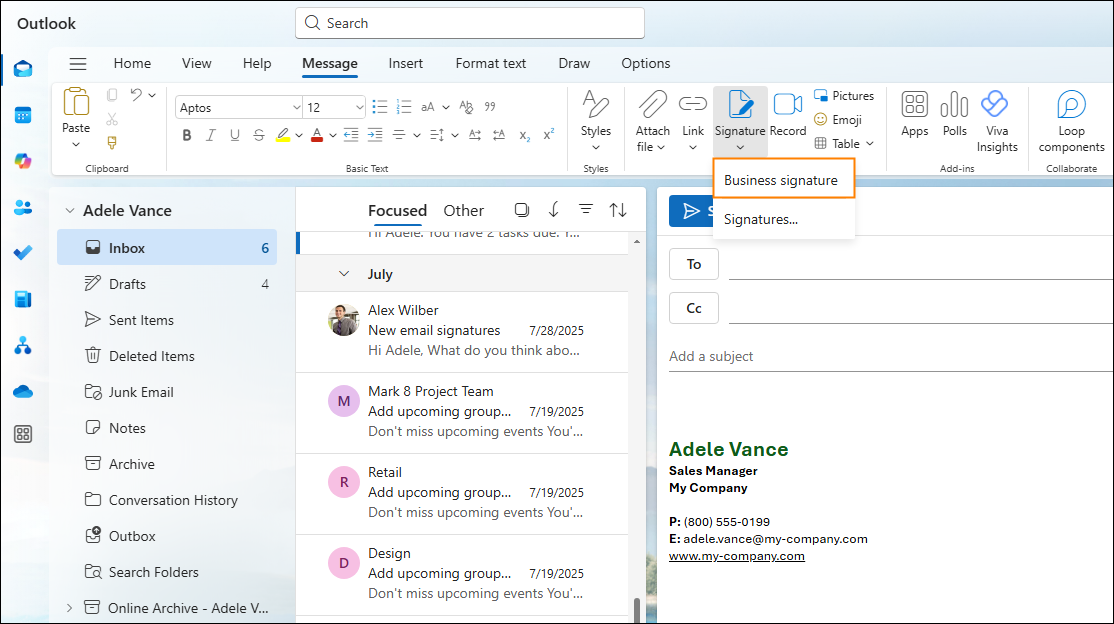
Learn more about creating email signatures in new Outlook for Windows
Outlook for Mac
- Open Outlook and click Outlook > Settings on the top menu bar.
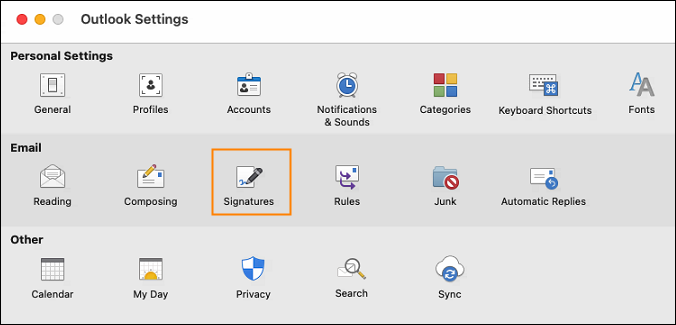
- In the Email section of the Outlook Settings window, select Signatures.
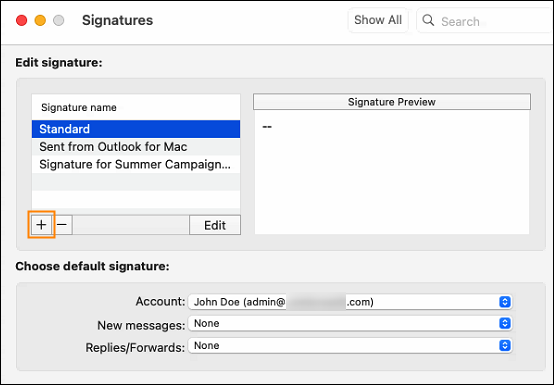
- In the Signatures window that opens, click the + button under the list of existing signatures to create a new signature. A separate window will open.
- Type a name for your signature in the Signature name field and switch to the text field below to create your signature block using the available formatting tools.
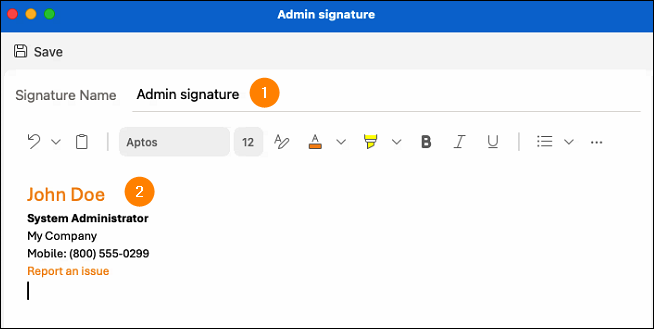
Need more tools or a ready-to-use signature template? Check out our free email signature generator.
- Click Save to save changes.
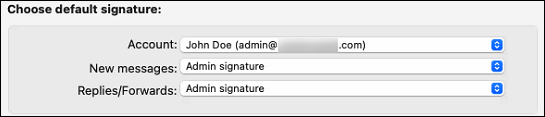
- Back in the Signatures window, you can set the new signature as default for new messages and/or replies and forwards.
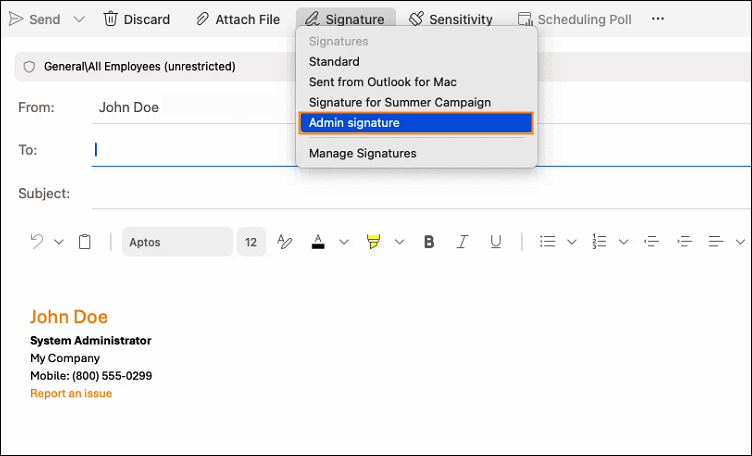
- To check if the signature works correctly, open a new email message. The signature should already be there if you have set it as default. Otherwise, click Signature on the top toolbar and select the name of your signature to insert it into the new message.
Learn more about creating email signatures in Outlook for Mac
Outlook on the web (OWA)
- Sign in to Outlook on the web and click the gear icon (Settings) in the top right corner.
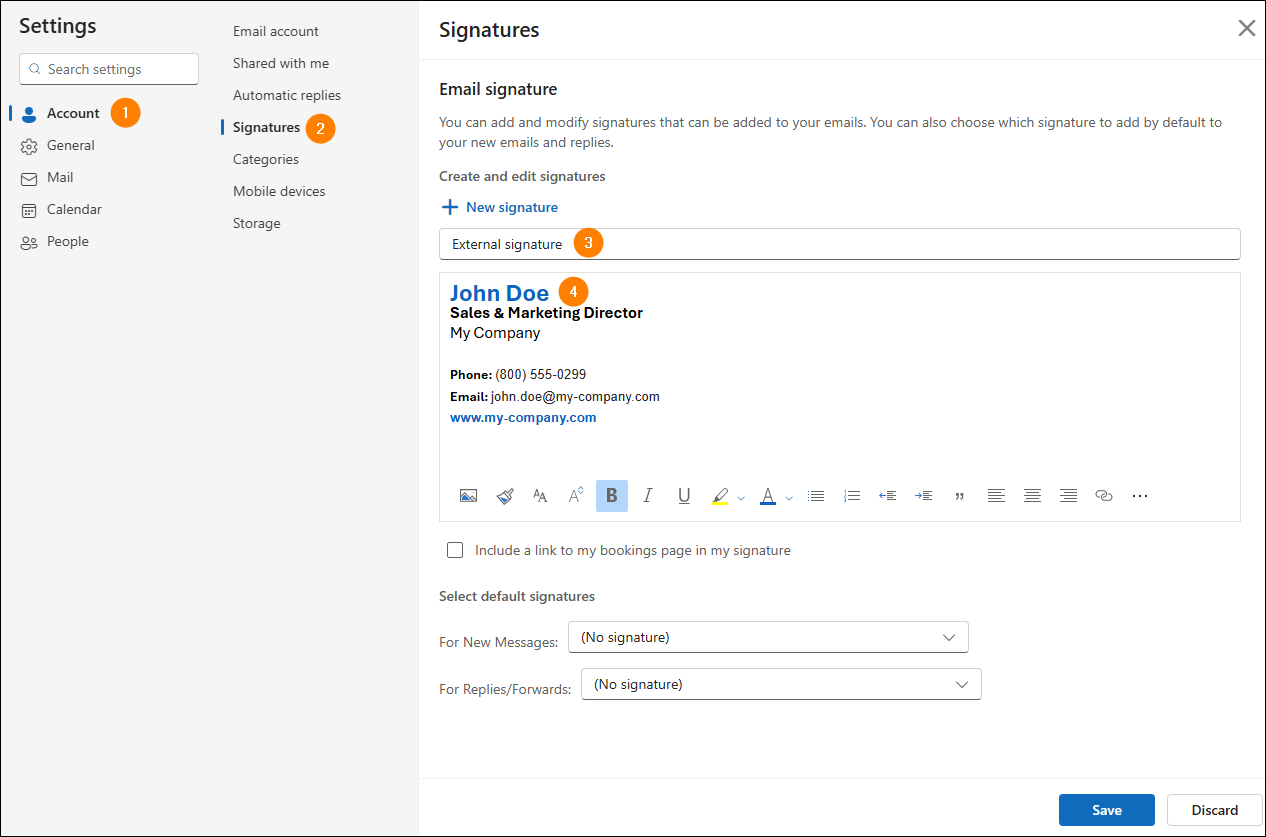
- In the Settings window that opens, select Account > Signatures.
- In the Signatures section, type a name for your signature in the Edit signature name field and switch to the text field below to create your signature block using the available formatting tools.
Need more tools or a ready-to-use signature template? Check out our free email signature generator.
- Click Save to save changes.
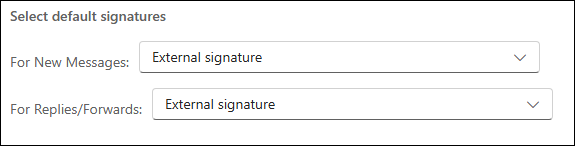
- In the Select default signatures section, you can specify if you want to add the signature by default to new messages and/or replies and forwards. Then, click Save again.
- To check if the signature works correctly, open a new email message. The signature should already be there if you have set it as default. Otherwise, select the Signature button on the ribbon and choose your new signature to insert it into the message.
Learn more about creating email signatures in Outlook on the web (OWA)
Outlook for Android
Designing a mobile email signature for Outlook for Android is a different beast altogether than doing it in the desktop Outlook apps. Since Outlook for Android’s capabilities are very limited and its signature editor is hard to use, the best way is to generate an HTML email signature on your PC, save it as a file, and send it to the mailbox that you use in mobile Outlook.
See this article to learn how to generate an HTML email signature and save it to a file
Next, follow the steps below to add your signature in Outlook for Android:
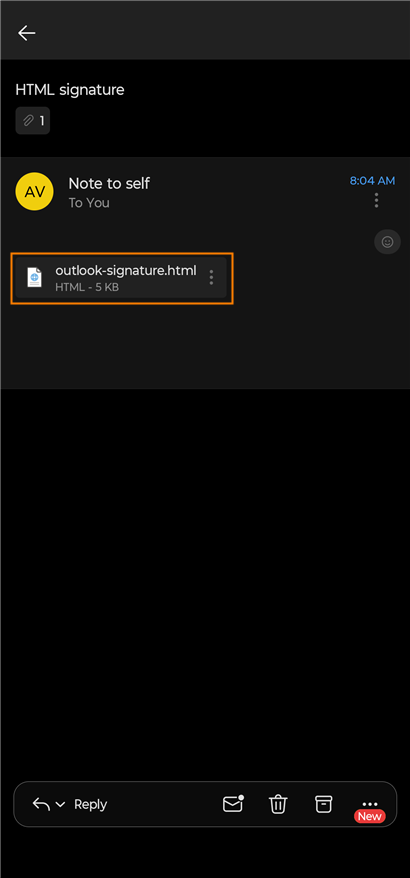
- Run the Outlook app and open the email message with the HTML email signature that you’ve designed and sent to your email address. Next, tap the HTML file to open it.
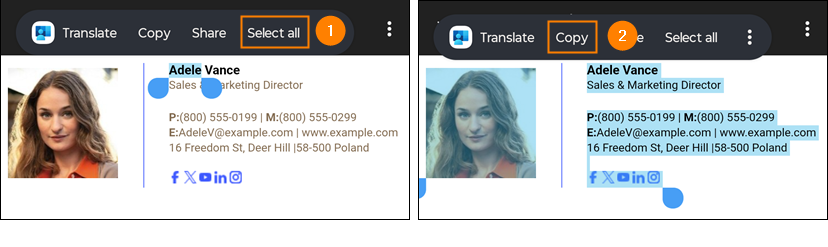
- Tap and hold any text part of your signature and tap Select all > Copy. Don’t worry if the signature looks like it’s broken – it will turn out great when you need it.
- Back in the Outlook inbox, tap your profile picture and select the gear (Settings) button.
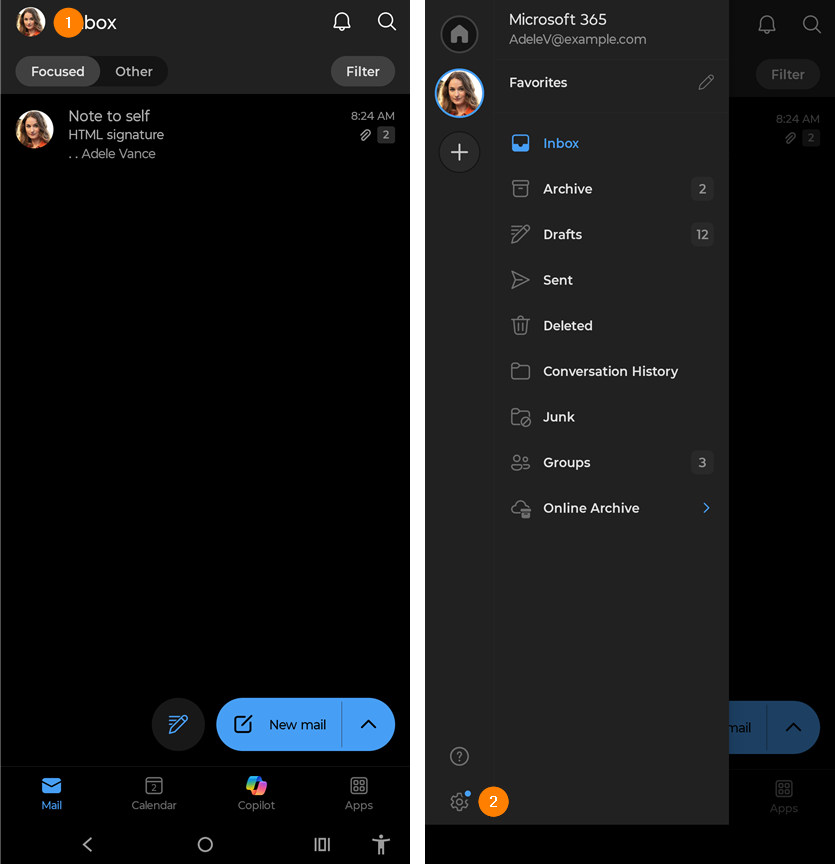
- On the Settings screen, go to Quick Settings > Signatures.
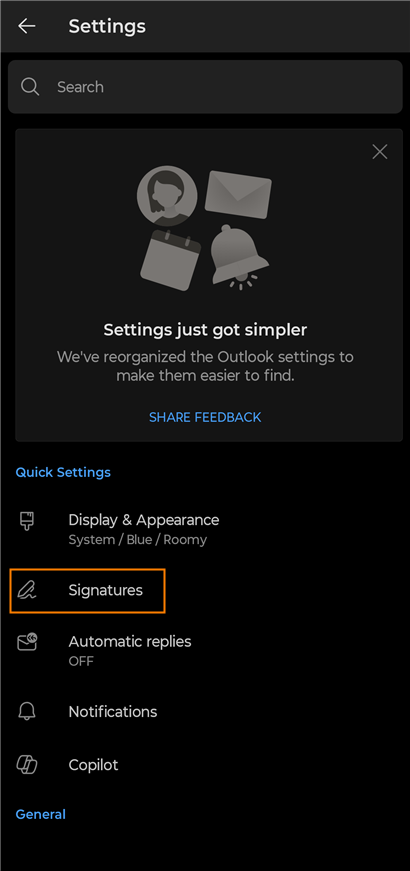
- If you’ve never changed your mobile email signature, remove the default text (“Sent from Outlook for Android” or “Get Outlook for Android”).
- Next, tap and hold the Signature field and select Paste to insert the HTML email signature you’ve copied in step 2.
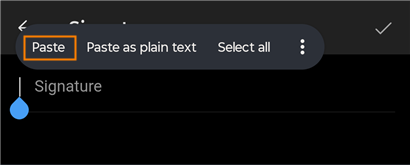
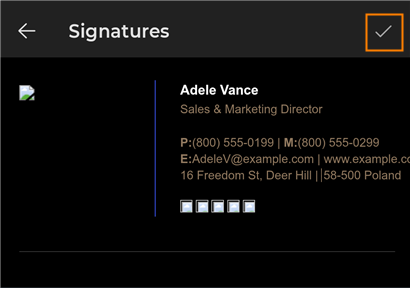
- Your signature may still look broken, but you will see it’s fine when it gets to the actual mobile email. Tap the tick button to save your changes.
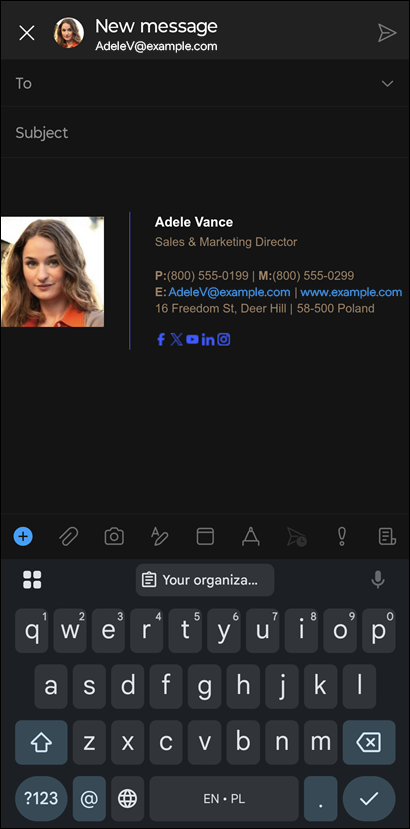
- To check if the signature works correctly, open a new email message. The signature should already be there, with no broken images and formatted just the way you designed it.
Learn more about creating email signatures for Outlook for Android
Outlook for iOS
Designing an email signature in Outlook for iOS is not easy to handle. Since Outlook for iOS’s capabilities are very limited and its signature editor is hard to use, it’s better to use an online generator to design an email signature in your device’s browser and paste it in Outlook’s settings. Here’s how to do it:
- Use the free email signature generator on your device to design a signature for the Outlook platform. Follow the instructions in the generator or see our guidelines in the next chapter to learn how to do it.
- Once your signature is ready, copy it to the clipboard by tapping Apply your signature > Copy.
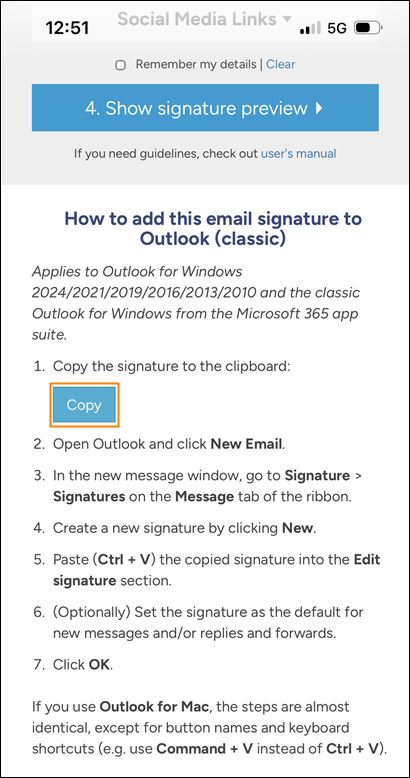
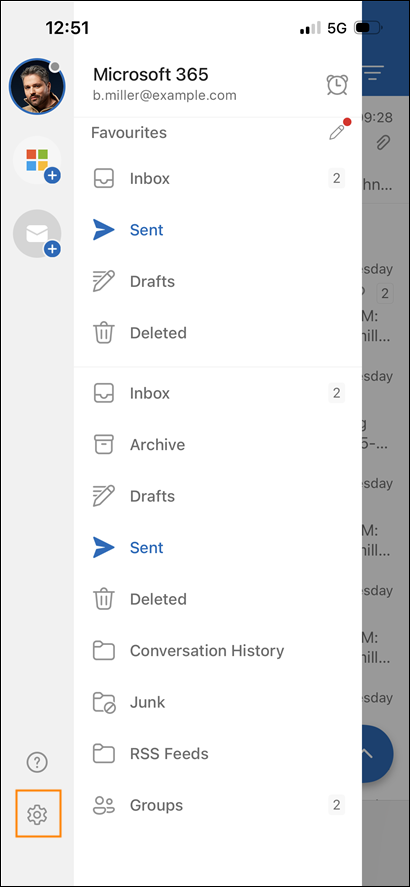
- Next, run the Outlook app, tap your profile picture and select the gear (Settings) button.
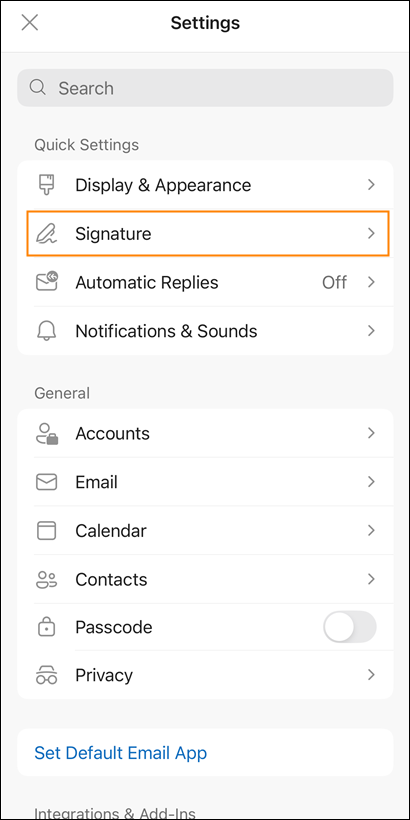
- On the Settings screen, go to Signature.
- In the signature editor, delete the default “Sent from Outlook for iOS” signature and paste the email signature you’ve copied in step 2.
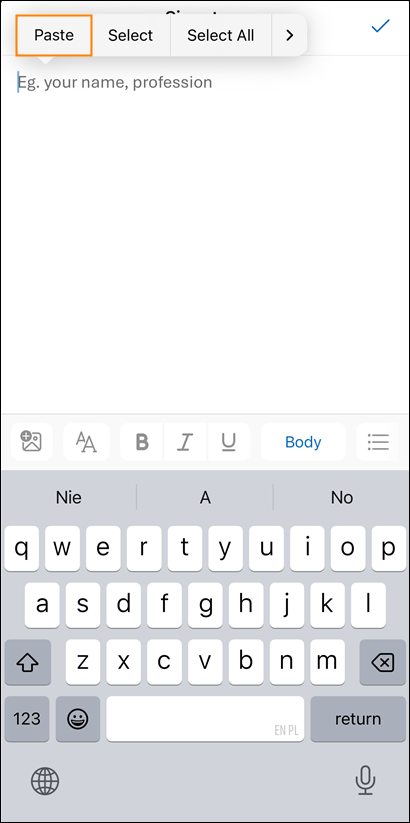
- Save your changes to apply the signature.
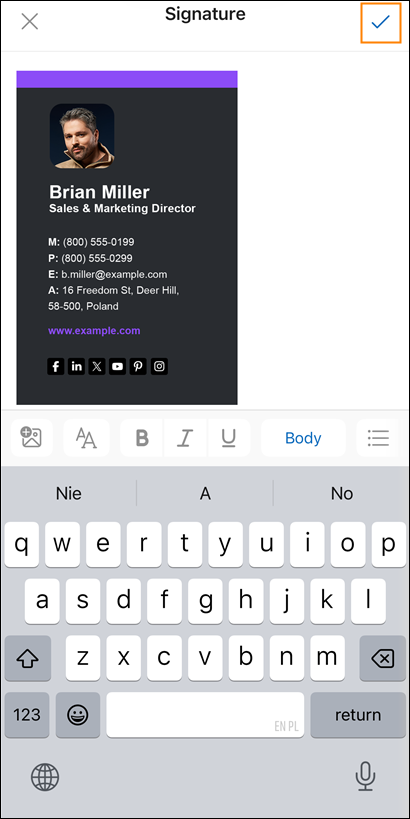
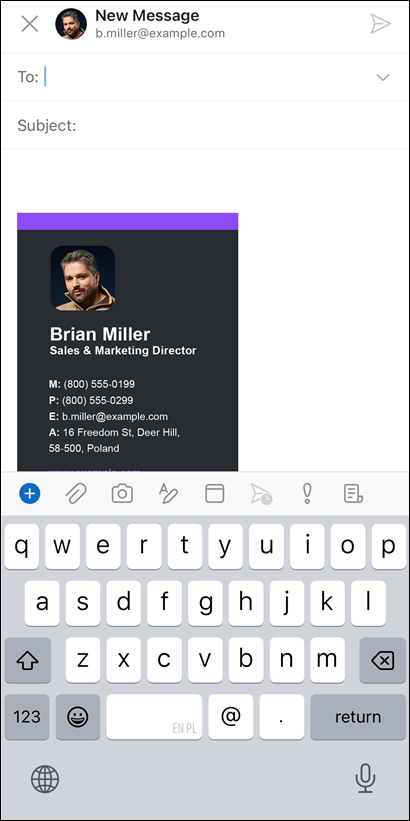
- To check if the signature works correctly, open a new email message. The signature should already be there.
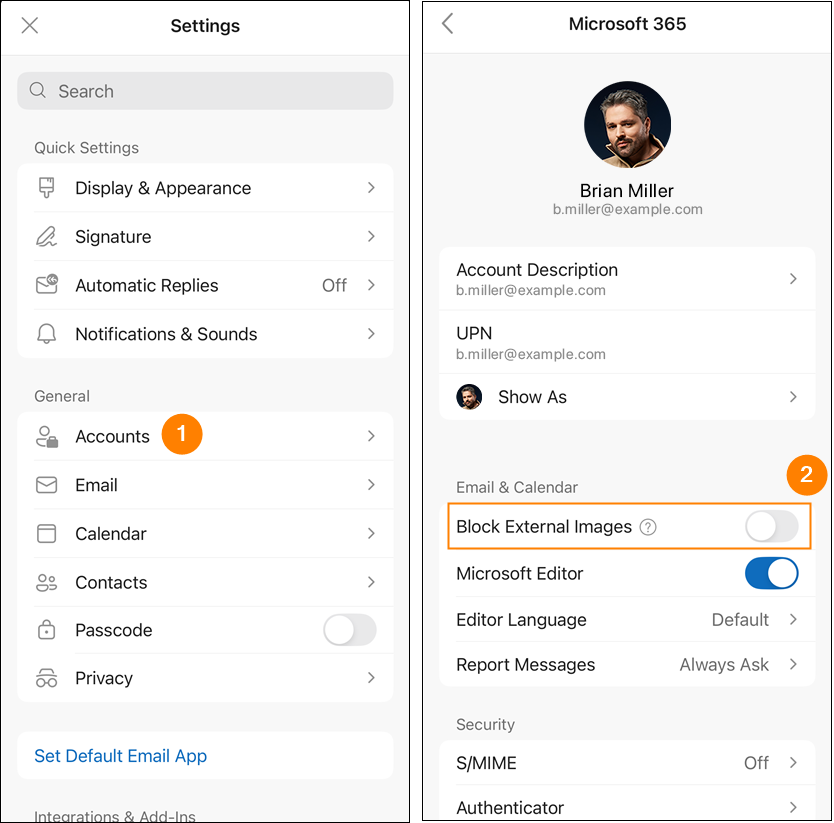
Tip: Make sure to disable the Block External Images toggle in Settings > Accounts. Otherwise, images in your signature might not be displayed correctly.
Learn more about creating email signatures for Outlook for iOS
Free email signature generator for Outlook
If you’ve tried setting up a professional email signature for Outlook using the app’s built-in editor, you know that it comes with only the most basic formatting tools and lacks a signature template portfolio. So, if you want to create a signature that really shines or if you’re looking for ready-to-use templates that match the Outlook email signature format, check out our free email signature generator. It will only take you a few moments to create your own signature for Outlook with the tool. Just open the generator in your browser and follow the steps:
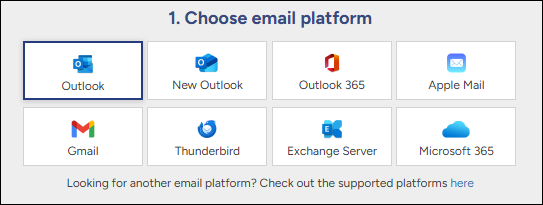
- Choose your email platform:
- Outlook – for any classic Outlook for Windows or Mac version, as well as for Outlook for Android and iOS,
- New Outlook – for new Outlook for Windows,
- Outlook 365 – for Outlook on the web (OWA).
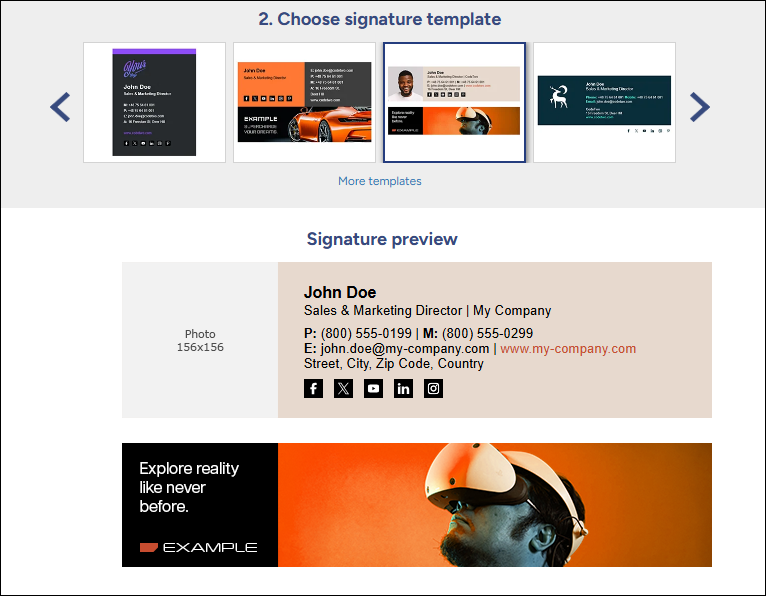
- Optionally, select one of the 100+ customizable templates. The template portfolio includes both simple compositions and modern templates with dynamic graphic elements.
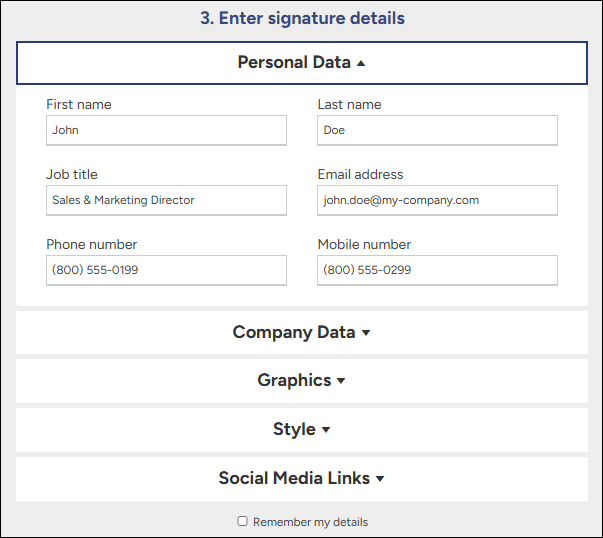
- Enter or adjust signature details, such as first and last name, email address, or phone number, and put some spirit into the signature by adding a profile picture, corporate logo, or marketing banner. Don’t forget about including social media links to boost your online presence!
- Click Apply your signature and copy and paste your signature into the signature editor in Outlook. Follow the instructions in the generator or use the guidelines from the previous chapter to find out how to do it.
Tip: at each stage, the generator allows you to preview how your email signature will look in both the light and dark modes. Working in dark mode is becoming more and more popular, not just among devs. For that reason, make sure to check that your signature is optimized for dark mode before applying it in Outlook.

Learn more about how to use the free email signature generator
What to include in an email signature?
Now that you know how to create and set up an Outlook email signature, let’s discuss what you should actually include in it to unlock all the opportunities that a good signature can afford. First of all, you should ask yourself a question: why do I need an email signature? There are lots of possible answers:
- To show my contact details to my recipients
- To inform them about my corporate title
- To make a positive impression on my recipients
- To level up my company’s digital identity
- To include links to my or my company’s social media profiles
- To increase traffic on my website thanks to hyperlinks or banners
- To attach an unsubscribe link under my newsletter
Based on your answers, you should already get a hint on what to include in your email signature. To make the most of it, however, take a look at our checklist of key email signature elements. Of course, not all of them are required. Still, consider them all to really make a mark with your signature.
Key email signature elements – a checklist
- Contact information – your full name, phone number(s), and email address
- Job title
- Company name
- Company address
- Your photo
- Company logo
- Website link
- Social media links
- Call to action link
- Booking link
- Marketing banner or other graphic elements
- Badges and awards
- Legal disclaimer or confidentiality statement
- Newsletter (un)subscribe link
- One-click surveys for measuring customer experience
- Out-of-office statement
Great examples of professional email signatures for Outlook
Finally, take a look at some of our favorite examples of professional email signatures for Outlook (or for any other email app). They should really put you in the picture about what a good signature looks like. And the best part is that they’re all available as templates in our email signature generator. Feel free to use them without spending a dime!
Email signature with an animated banner
Bring more energy into your email conversations and draw attention to your marketing campaigns by including animated banners in your email signature.

Modern & bold email signature
A bold email signature is like a bright and flashy car in the parking lot – it’s hard to miss! Use it, then, to showcase your brand and get noticed.

Black and white email signature
In contrast to the previous example, this toned-down signature doesn’t need garish colors to draw attention and create a strong professional image.

Simple email signature with a logo
Placing a company logo in a business email signature is a no-brainer. Use the logo’s simplified or monochromatic version to make sure it will look appealing across all email apps and devices.

Email signature with a photo and background color
Using a background color is always a great idea if you want your signature to stand out in any email thread.

Vertical email signature with a banner
If your clients are likely to read your emails on smartphones, go for a vertical template to better optimize your signature for mobile apps.
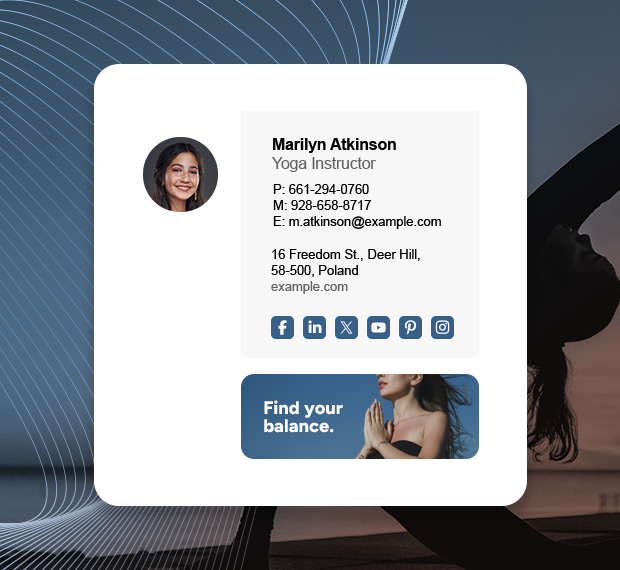
Minimalist email signature with social media links
If you use social media marketing to build brand awareness and promote your business, include distinct social links in your email signature to boost your social media following.

Check out this article to see more email signature examples for all purposes
Best tool for company-wide email signature management
With our definitive guide to email signatures for Outlook, setting up a professional email signature should really be a breeze now – at least if you want to create a signature for yourself. But what if you need a tool that would let you set up and deploy corporate signatures for your entire company?
In this case, you’ll need a reliable email signature management tool like CodeTwo Email Signatures 365. This easy-to-use solution allows a single person to centrally manage signatures for all employees within a Microsoft 365 environment. It supports all email clients, including Outlook, and all devices, including mobiles. What’s more, it comes with an Outlook add-in that lets users get personalized signatures directly in Outlook as they’re composing their messages – with no additional configuration needed!
So, if you want to implement a unified email signature format for all employees in your organization, don’t even bother asking them to set up the signatures on their own (you know it won’t work, even if they read this guide). Instead, check out CodeTwo Email Signatures 365 and do it as a professional.