

Even if you’re not a professional graphic designer, basic image-editing skills can come in handy.
Mail-signatures.com is primarily about email signatures, so in this guide, I’ll focus on simple actions that are commonly used when creating or editing email signatures. Take a look at the table of contents for quick navigation, and if you’d like a quick guide to any other action in GIMP, let me know in the comments!
Psst… If you need to change a social media icon in your email signature design, we’ve prepared a large selection of them in various styles: Download free social media icons.
About GIMP
GIMP (GNU Image Manipulation Program) is a free, cross-platform image editor designed for easy editing of raster graphics. I find it straightforward to use, especially if you need to make a quick change to an image used for, say, an email signature. Most importantly, it gets the job done, and I’ll show you how to use just a small selection of its available features.
Exporting images
After you finish editing any image in GIMP, you need to export it to save your changes. To do that:
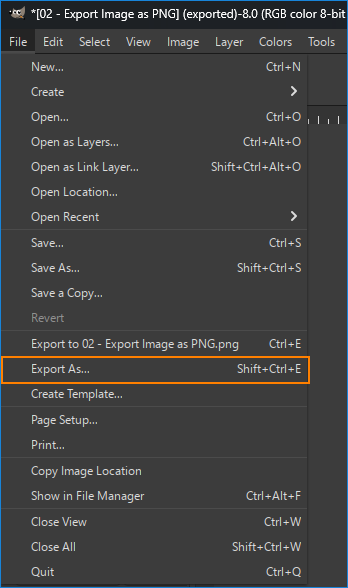
- Use the keyboard shortcut Ctrl + Shift + E or go to File > Export As.
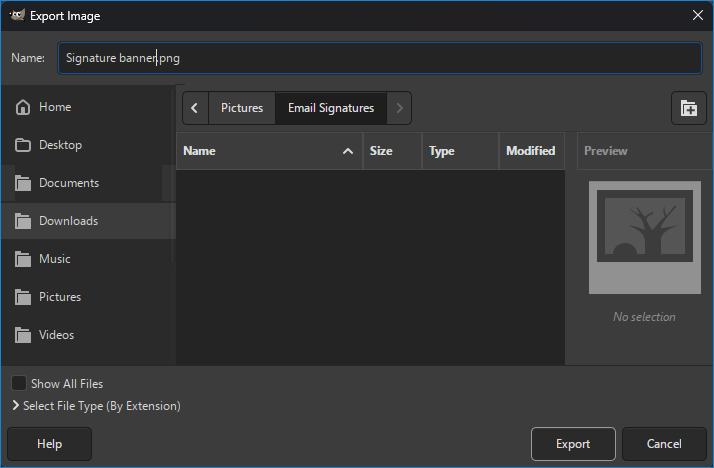
- In the Export Image window, choose the export location and file name. You can select the image format here by clicking Select File Type (By Extension) or by changing the extension directly in the file name (for example, from .png to .jpg). Click Export.
- In the next window, you’ll see some advanced options, depending on the file format you’ve chosen.
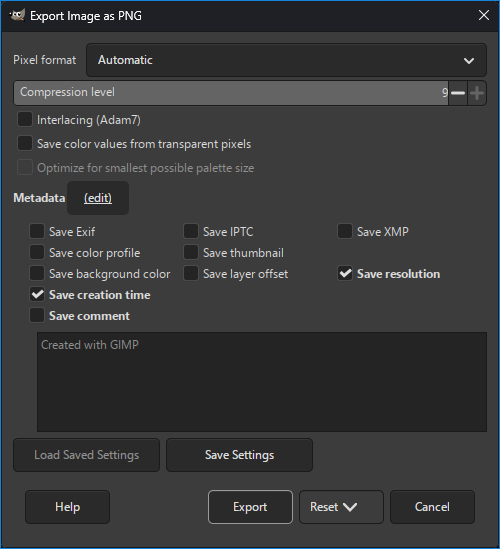
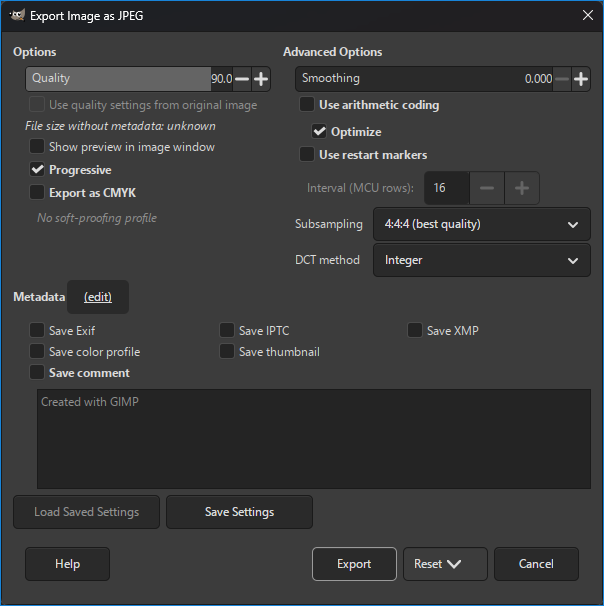
Image exporting tips
- If you’re exporting to JPG, don’t go above 90% quality. Higher settings usually increase the file size significantly without any visible improvement in quality. For most images, 75% quality offers a good balance between file size and image quality.
- In general, JPGs tend to be smaller, but in some cases, PNGs are better suited for certain images, offering a reasonable file size with no quality loss. It’s best to export images as both PNG and JPG and compare the results, especially for larger images, such as marketing banners.
File formats
There are three file formats recommended for email signatures. Take a look below for a quick explanation of each format and when to use it.
- PNG – this format supports transparency, so, for example, your social media icons or photos can have rounded corners and look great in both light and dark mode. Use PNGs for most signature elements.
- JPG (JPEG) – one of the most popular image formats. Its main advantage over PNG is that it usually results in a smaller file size, thanks to its compression. Use JPGs for banners and user photos when transparency is not needed.
- GIF – the only format with reliable support for animations across most email apps. Use GIFs for animated email signatures.
How to scale an image
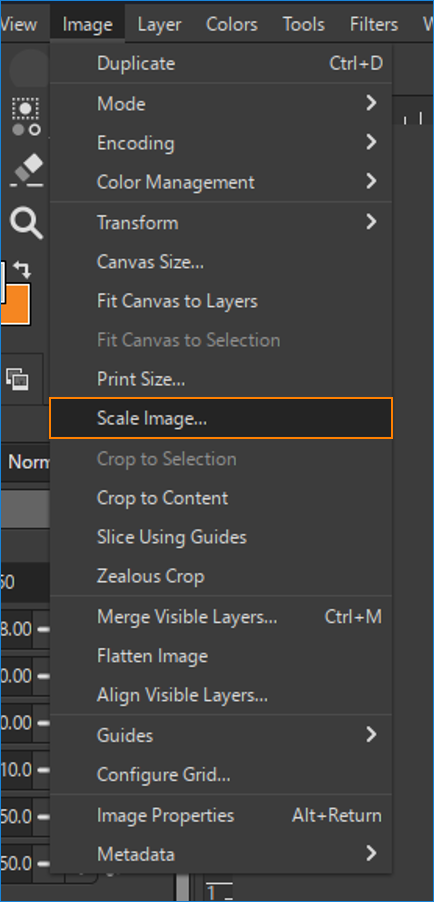
- To scale (resize) an image, click Image > Scale Image.
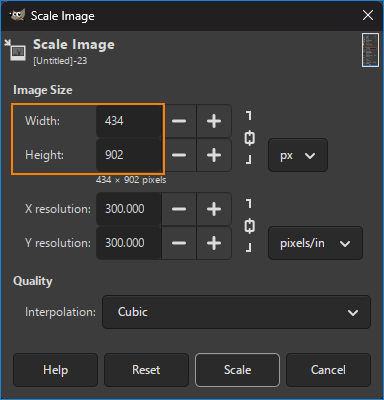
- Enter the new values and click Scale.
- Export the image.
Scaling tips
Both upscaling (increasing the image size or zooming in) and downscaling (reducing the image size or zooming out) can affect image quality. It’s especially noticeable if your design includes text. For best results, downscale images to exactly ½ or ¼ of their original size. For example, a 400 x 400 px logo can be scaled down cleanly to 200 x 200 px or 100 x 100 px without quality loss or with minimal quality loss.
How to crop (remove whitespace)
- The quickest method to crop an image that has too much whitespace is to use Image > Crop to Content.
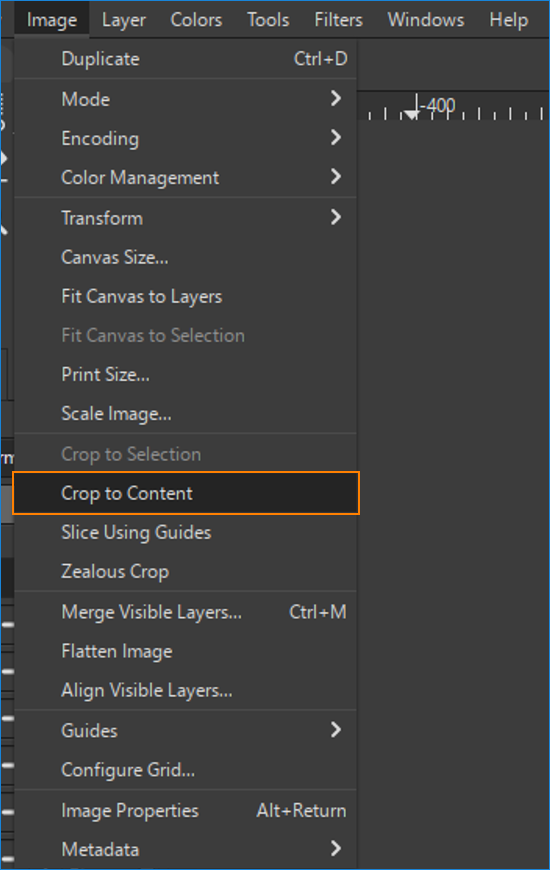
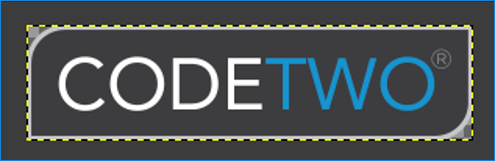
For example, Crop to Content transforms this image:
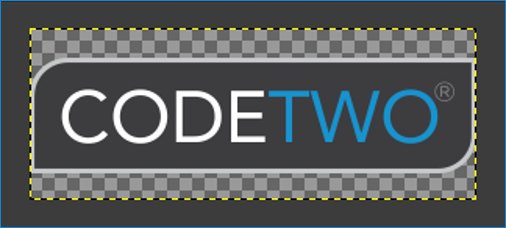
Into the following:
- Export the image.
Cropping tips
- Sometimes, leaving some whitespace can be beneficial. For example, some email apps are known to cut off a 1-pixel border around an image. Adding a 1-pixel-wide transparent border around an image might help it display correctly.
- It’s a bit unconventional, but in compact signatures, whitespace can be used together with padding and margins set to 0 to control spacing between elements.
How to cut out an element from a mockup
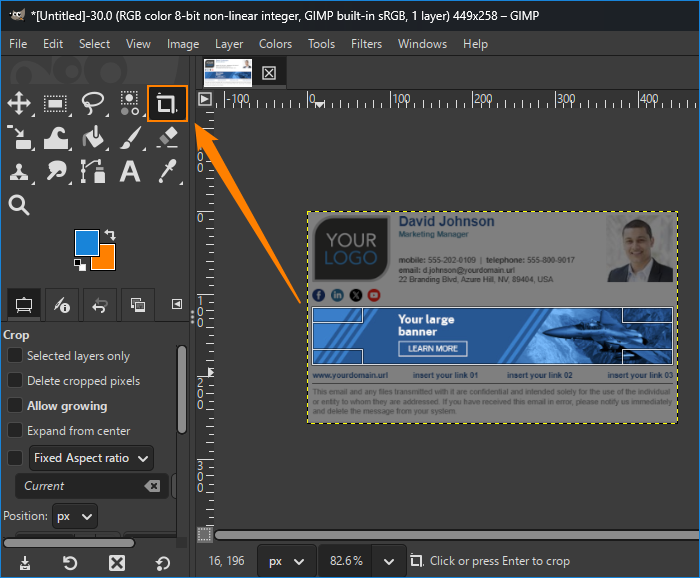
If you have a mockup or an image-only email signature version, you may need to cut out specific elements to convert the signature to an HTML version. To do that:
- Use the crop tool (Shift + C), select the element and press Enter. For better precision, zoom in using Ctrl + mouse wheel up. Alternatively, use any of the Select Tools and click Image > Crop to Selection.
- Export the image.
Cutting tips
- Instead of cropping, you can cut and paste elements to get each one onto a separate layer and save the file in XCF format. This way, if you need to edit anything in the design later, you can easily access each element.
- For round social media buttons, make sure they have a transparent background. Otherwise, they won’t be dark-mode friendly.
How to add a background
Sometimes, you have an image with a transparent background and want to add a background color of your choice.
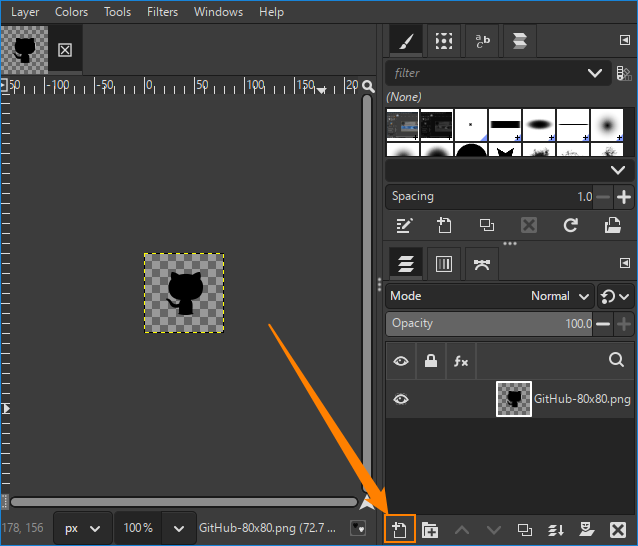
- To add a background to a PNG image with transparency, first create a new layer by clicking Create New Layer at the bottom of the Layers dialog (or using the Ctrl + Shift + N shortcut).
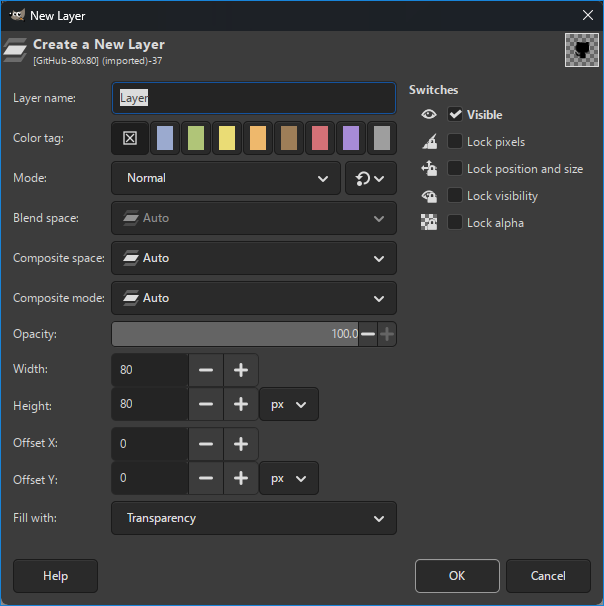
- Leave the default settings and click OK or press Enter.
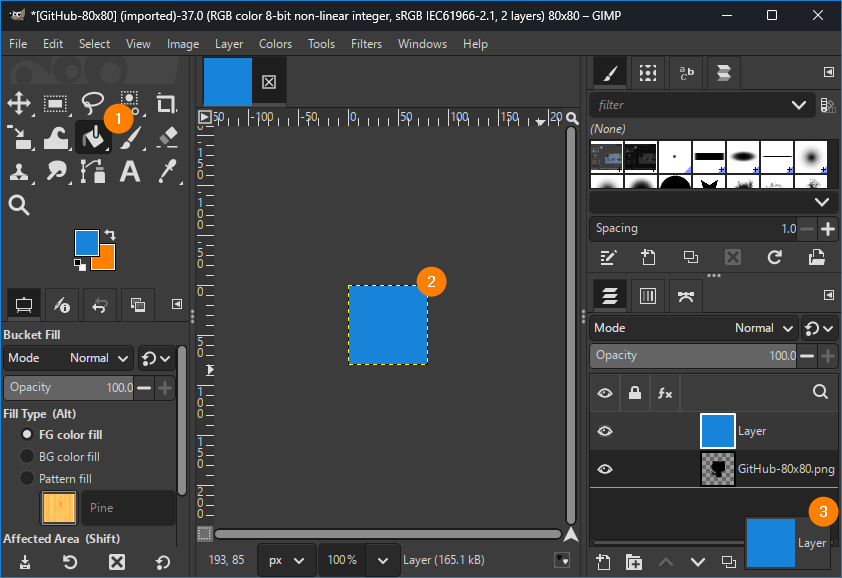
- Add the background of your choice to the new layer. In this example, I’m using Bucket Fill (1). If you prefer a gradient, click and hold the Bucket Fill button to access the Gradient Tool. Fill the empty layer (2), and then drag and drop the background layer to the bottom of the layer list (3).
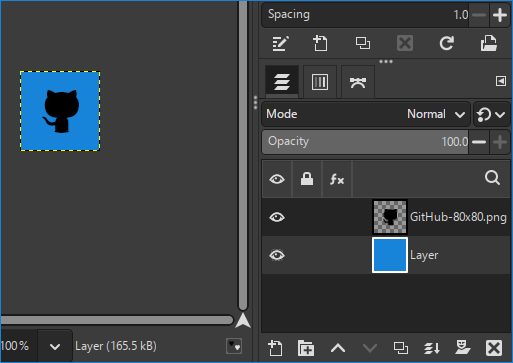
- Export the image.
Background tips
- Remember that some image backgrounds might make the signature look all wrong in dark mode. A white background will look the same as a transparent one in light mode, but in dark mode, it will stand out.
- If you want to see how specific images look in dark mode, go to our signature generator or template library – every signature includes a dark mode preview.
How to remove the background
I’ll show you three different methods of removing backgrounds from images. The first works best for homogeneous backgrounds, while the second is useful for gradients and more complex backgrounds. The last one is quick and easy but works only if an alpha channel has been added, so it requires an additional step for JPGs.
Color to Alpha
- Go to Colors > Color to Alpha.
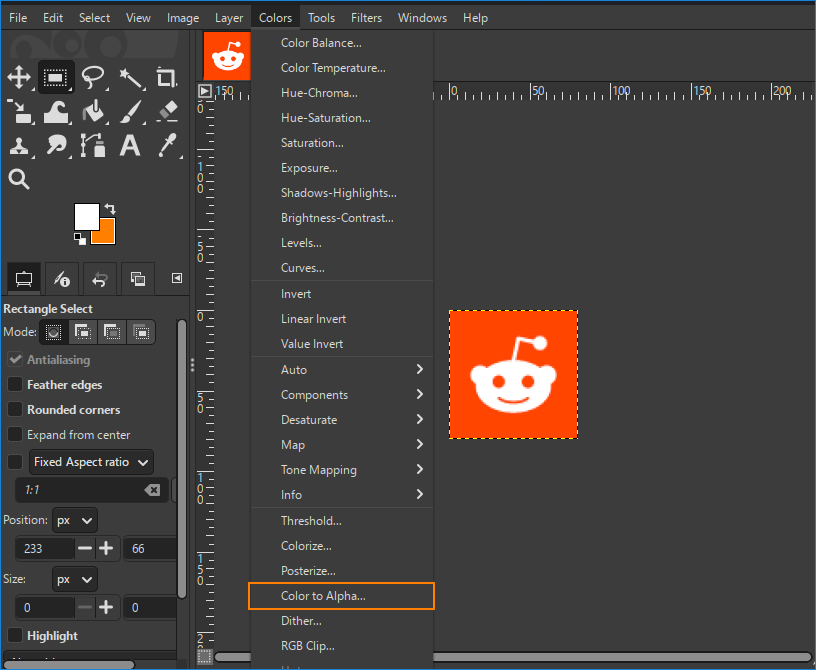
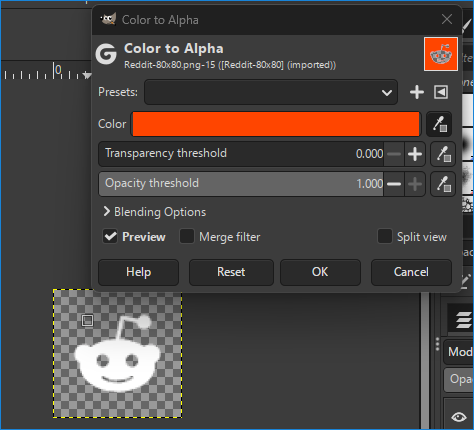
- Use the color picker to choose which color should become transparent. Increase the threshold to remove more similar colors (for example, where the background meets your main element). When finished, click OK.
- Export the image.
Cut and paste
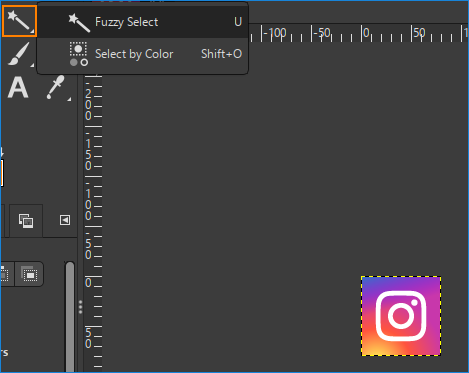
- Click and hold the Fuzzy Select tool and move your cursor to Select by Color (or use Shift + O). Click the element you want to keep. If your element is multicolored, you can add more colors to the selection by clicking them while holding Shift.
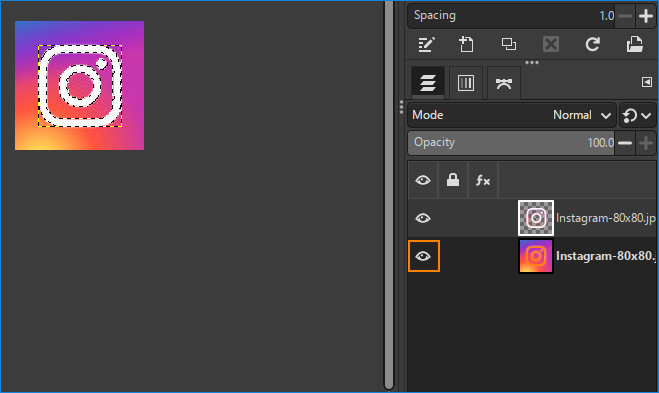
- Cut and paste (Ctrl + X and Ctrl + V) your selection. This will create a new layer with your selection on a transparent background. Then, click the eye icon next to the background layer to toggle its visibility.
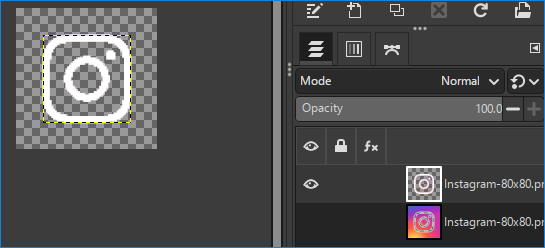
- Export the image.
Select by Color and delete
This method is similar to the Cut and paste method, so which one you choose depends on your personal preference. It works great for PNG files. When working with JPEGs, you’ll need to add an alpha channel, as I’ve shown in the Color to Alpha method.
- Use Select by Color and click the element you want to keep.
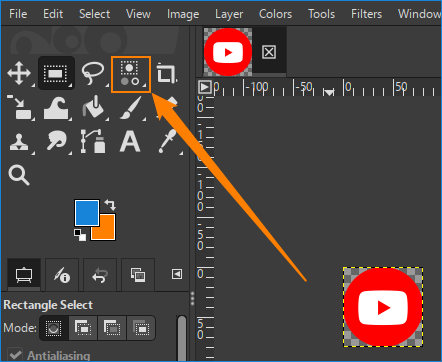
- Go to Select > Invert (Ctrl + I).
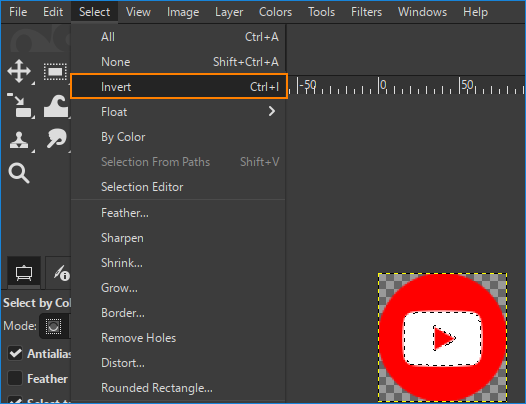
- Press Delete.
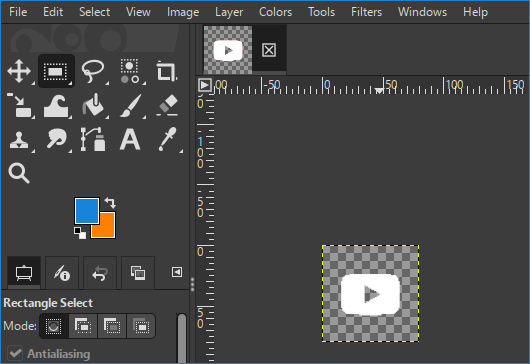
- Export the image.
Get a color’s hex code
When creating an email signature design in HTML, you often need to find out the hex values of certain colors to keep your signature visually consistent.
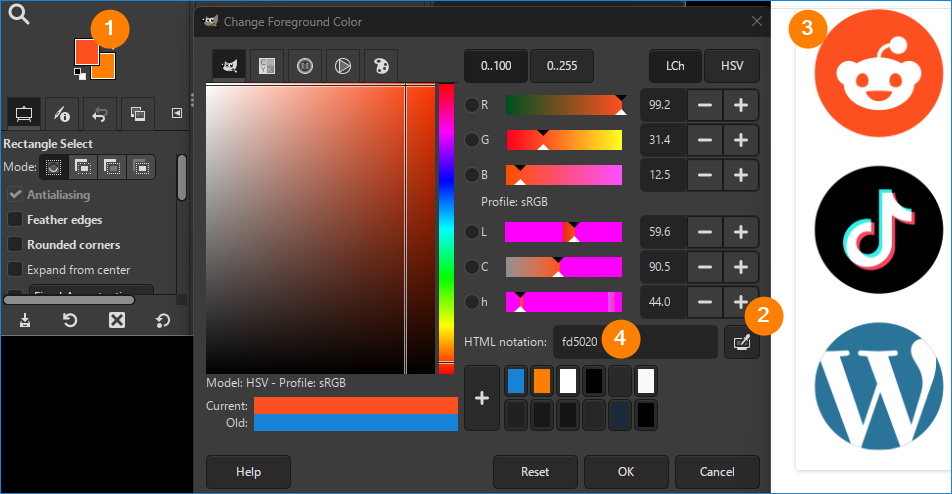
Click Change Foreground Color (1), select the color picker (2), then choose a color (3), and the value will automatically appear in the HTML notation field (4).
Tips
- Remember that to use a color’s hex value in HTML, you need to precede it with a #.
- The color picker in GIMP lets you check the hex values of colors outside the GIMP editor window.
- When trying to get a color code from a small element, you might want to take a screenshot, zoom in using GIMP, and then check the color with the picker. Zooming in also lets you see whether the color is solid or only appears solid.
How to add a border
If you want to add a border to an image (for example, a user’s photo) without losing any part of the original image, follow these steps:
- Go to Image > Canvas Size.
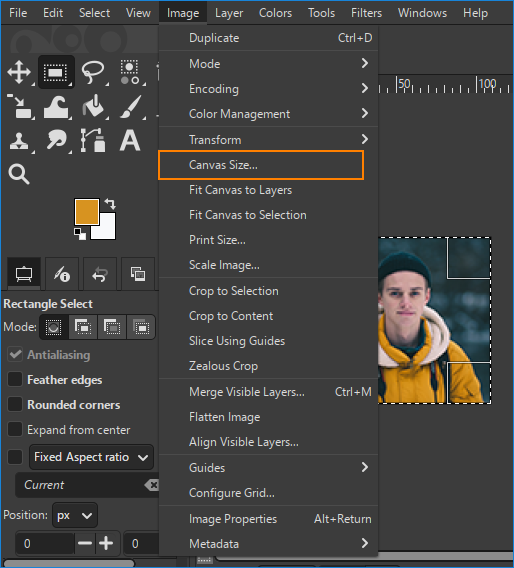
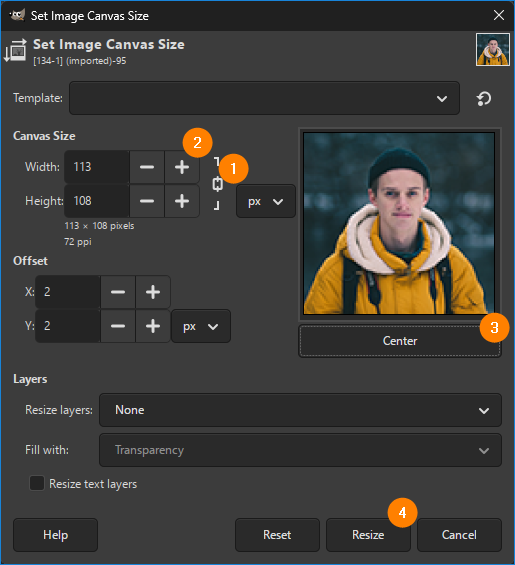
- Lock the width-to-height ratio (1), increase the dimensions by twice the border size (2), center the image (3), and click Resize (4).
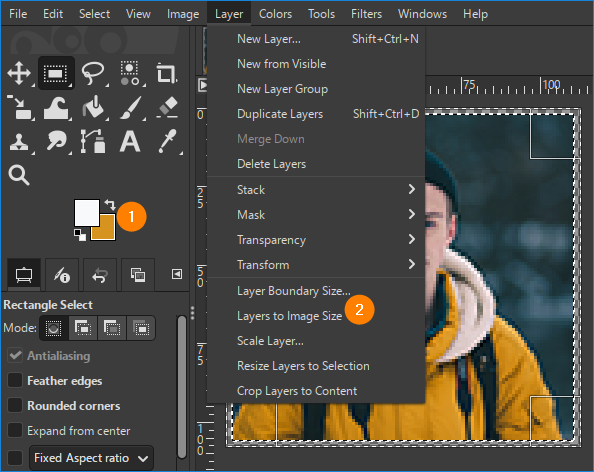
- Change the background color (1) to the color you want for the border, and click Layer > Layers to Image Size.
- Export the image.
Here’s how the image looks before and after adding the border:

Border tips
- Instead of adding borders directly to the image, you can use inline CSS.
- If you want to keep the original photo’s dimensions instead of adding extra space, you can draw borders directly on the image. To do that, select the whole image (Ctrl + A), go to Edit > Stroke Selection, and stroke a line with a width twice the size of the border you want to add (half of the line is drawn beyond the image’s boundaries).
How to add rounded corners
Here’s how to add rounded corners to an image:
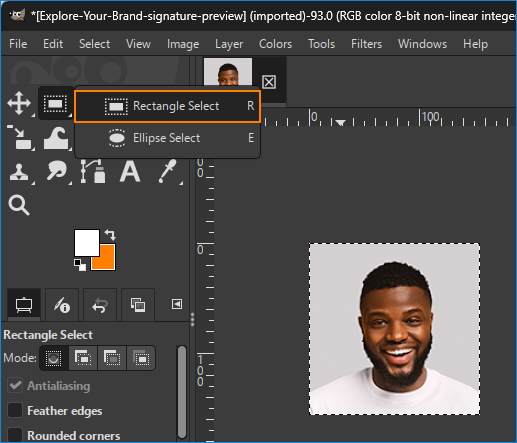
- To select a rectangle with rounded corners, use the Rectangle Select tool.
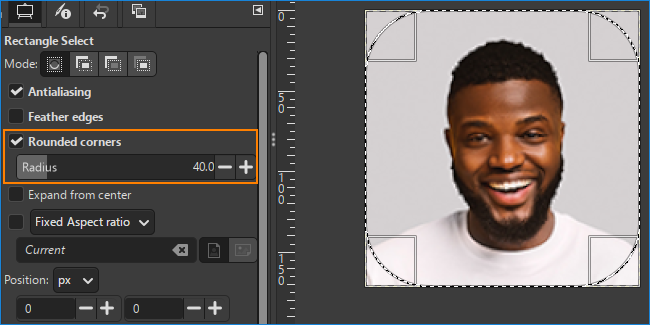
- Then, click Rounded corners in the Select tool’s options and use the radius slider to control the corner radius of the image.
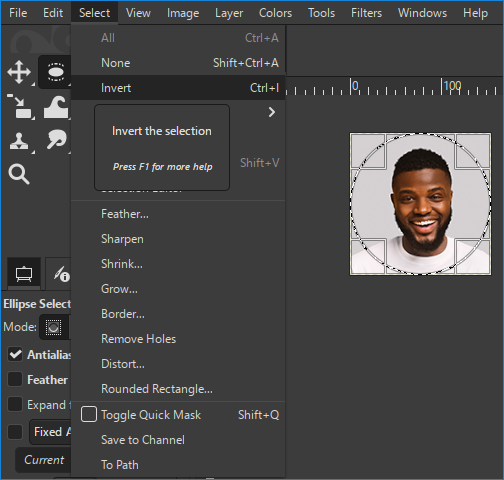
- Alternatively, if you want to turn your image into a circle, use the Ellipse Select tool. Select the whole image and click it once to turn a square into a circle or a rectangle into an ellipse. Finally, go to Select > Invert and delete the area outside the selection.
- Export the image.
Rounded corner tips
- While it’s much easier to add rounded corners using the inline CSS border-radius property, I generally don’t recommend it. Some email clients, including classic Outlook for Windows, don’t support border-radius. As a result, your signature may look different across email apps.
- Make sure to export the image to PNG. Otherwise, there will be white background visible in the dark mode.
Useful keyboard shortcuts
GIMP has a lot of keyboard shortcuts. You probably know some of them from other apps, and all available shortcuts are shown right next to the relevant options or displayed when you hover over a button. You can do everything without ever using these shortcuts, but learning them can make working with GIMP much quicker.
The list below contains some of the most commonly used GIMP keyboard shortcuts:
| Shortcut | Short name | Description |
|---|---|---|
| Ctrl + A | Select all | Selects the whole image. |
| Ctrl + C | Copy | Copies the selection from the active layer. |
| Ctrl + X | Cut | Copies and removes the selection from the active layer. |
| Ctrl+ V | Paste | Pastes the copied selection (or whatever you have in the clipboard) into a new layer. |
| R | Rectangle Select | Turns on the rectangle selection tool. |
| E | Ellipse Select | Turns on the selection tool for circles and ellipses. |
| U | Fuzzy Select | Selects a contiguous region based on color. |
| Shift + O | Select by Color | Selects the same or similar colors (depending on the thresholds) throughout the image. |
| Shift + C | Crop | Turns on the Crop tool. Select an area and press Enter to crop it. |
| Ctrl + Shift + N | Create a new layer | Creates a new layer above the active layer. By default, the new layer is the same size as your canvas. You can fill it with a specific color or transparency. Press Enter to confirm. |
| Ctrl + I | Invert the selection | Selects the area that is currently not selected. |
| Ctrl + Shift + E | Export an image | Opens the Export Image window and lets you export the image in the format of your choice. |