
For the most current information, see our latest step-by-step guide on adding an email signature in Outlook on the web (Microsoft 365).
Back in the day, when Exchange 2016 was released, OWA was replaced with a brand new and shiny Outlook on the web, known from Office 365 (or Microsoft 365, as the name also changed in the meantime). Since then, Outlook on the web went through some visual upgrades, but there wasn’t another name change (yet). What’s interesting is that despite the same name used for both on-premises (Exchange 2016 and Exchange 2019) and cloud environments, those Outlook versions are a bit different. Even though both clients are similar when it comes to setting up signatures, there are some noticeable differences. One of them is the path to the email signature editor.
Set up email signature in the cloud-based Outlook on the web
The layout of the email signature editor in the default Office 365 mail client is different, although, its functions are primarily the same as in the on-prem version of the client. Two additional buttons are present: format painter and quote.
- Log in to your Office 365 account and go to Outlook, or use the direct link.
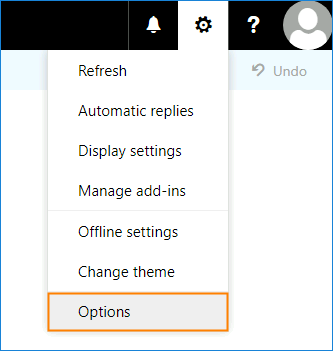
- Next, open the Settings by clicking the gear icon in the top-right corner. Then, click View all Outlook settings at the bottom of the pop-up window:
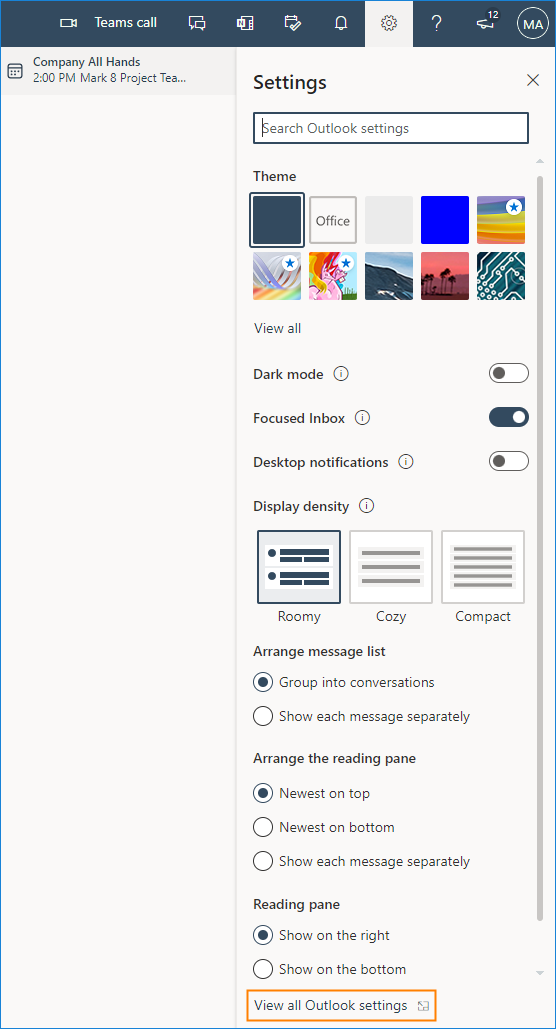

- Go to Mail > Compose and reply. Here, you can create or edit your email signature, and choose whether it should appear automatically in your new messages and replies/forwards respectively. If you leave both drop-down menus with their default values (No signature), you will have to add the signature manually when composing an email. The Settings window should also be accessible using this link.


- Instead of creating your signature from scratch, you can use the free email signature generator to quickly create a well-formatted email signature and paste it into the Outlook on the web’s signature editor.
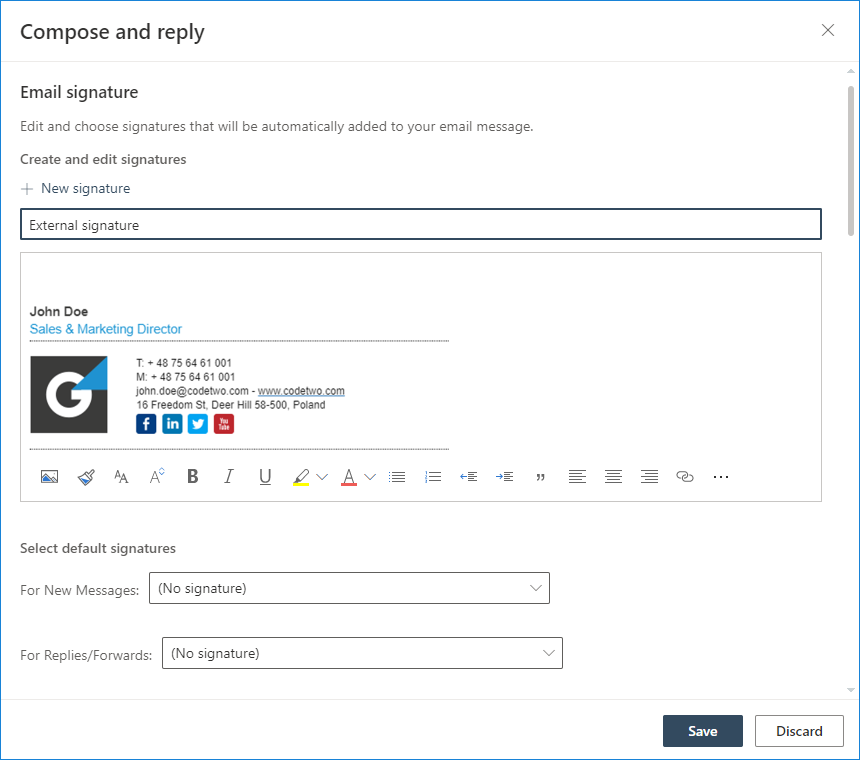

- After you finish setting up the signature, hit Save. The signature settings should be applied right away. Unlike the on-prem version, it is possible to create and use multiple signatures for a single mailbox – similarly to the Outlook desktop client. Just click the New signature button after you have saved your first signature to create another one.
Set up an email signature in Outlook on the web in Exchange 2016 or 2019
Outlook on the web looks a bit differently from its Microsoft 365 counterpart. Read on to see how to access the email signature settings and add or edit your Outlook on the web signature.
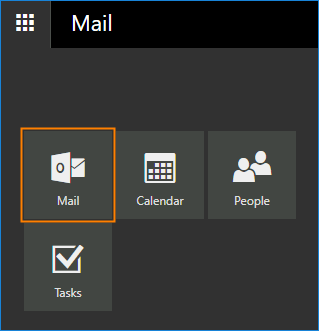
- Log in to your Outlook on the web account and go to the Mail app.

- In Outlook on the web, go to settings (it’s a gear icon at the top right-corner of the screen) and click Options.

- On the left pane, go to Mail > Layout and select Email signature.


- To make the signature appear in every new email message, check the Automatically include my signature on new messages I compose box. There is also a corresponding option for replies and forwards available. Compose your email signature using available formatting tools. You can also create your signature with the free email signature generator and then paste it to Outlook on the web’s editor.


- When your signature has been created, hit the Save button so that all changes take effect.


- Back in your inbox in Outlook on the web, you can check if the settings were applied correctly. If you selected to have your signature added automatically, it should be applied at the bottom of your email when you create a new message.


That’s it! Now you do not have to waste time on creating a signature from scratch every time you write a new email. Your signature will already be there.
If you want to change your email signature, just follow the above steps again.

Central email signature management
While the method above is a quick and easy way to set email signatures in OWA, it has some drawbacks (see this article for more information on this topic). If you want to ensure that every mail is well-branded and includes all the details you require, you should manage email signatures centrally, from one place. See the links below to learn how to do this natively.
- How to set up email disclaimers on Exchange Server
- How to create company-wide email signatures and disclaimers in Office 365
Limitations of the native email signatures solution
The native methods of central email signature management can help you unify email signatures in your organization. Sadly, this approach is still not perfect, as it lacks some significant features. To mention a few:
- Placing the signature directly under the latest reply or forward,
- Including inline images in email signatures (so that they do not show as attachments),
- Viewing email signatures in the Sent Items folder,
- Including individual users’ photos,
- Removing empty lines from signatures (e.g. if a user misses an attribute)
If you are looking for a solution which overcomes all those limitations, you have to use a third-party tool, like CodeTwo Email Signatures 365 (for Microsoft 365) and CodeTwo Email Signatures On-prem (for Exchange Server).


I have created my signature in Microsoft 365, has my logo, looks perfect, and hit save. But when
I send my email, my signature does not appear.
I went to settings-account-signatures – clicked my name, clicked …for new messages.. for replies.. still does not populate my signature.
Can you add this signature manually? There are some possible causes for this kind of problem in Microsoft 365. I’ll list the most probable ones:
1. You might have missed the “save” button after applying changes to email signature behavior. I know I’ve done this several times. See what happens when you open the settings again.
2. Email signatures in your Microsoft 365 organization might be centrally managed. If that’s the case, it is possible that the default Outlook signature is blocked. Solution? Tell your M365 admin about the problem.
3. Some settings might take a few moments to apply. Refreshing your browser after saving the settings might make the difference. Signing out and then signing in again might help.
4. There’s a setting called “signature cloud settings”, a.k.a. “roaming signatures” which sometimes causes some problems. If that’s it, your M365 admin could help.
My article on Microsoft 365 signature problems contains more helpful hints: https://www.mail-signatures.com/articles/problems-email-signatures-office-365/
Do let me know if you manage to get this fixed!
This article changed my perspective. Thank you!
I appreciate you sharing this blog post. Thanks Again. Cool.
This was beautiful Admin. Thank you for your reflections.
This is my first time pay a quick visit at here and i am really happy to read everthing at one place
Far out! Two approval. Cant wait to read more on your site. Your friend in Bailby .
very informative articles or reviews at this time.
Pretty! This has been a really wonderful post. Many thanks for providing these details.
Hi,
When HTML Email Signature copy from the browser and paste on the Microsoft Outlook Web. It breaks the line.
please help me how to solve it.
Link: shorturl.at/eqxV0
Is it an all-image email signature sliced into pieces? It is bound to break in most email clients, if not when you apply it, then when you send it. You could look into the HTML code and experiment with borders, padding and margins of each and every element, but it will be easier to go with a different design.
I could not resist commenting. Perfectly written!
Hi,
I have done everything you’ve said above and when I go into the settings my logo is there, but it doesn’t not apply to any emails.
Any suggestions?
To add the signature to emails, either select one of the Automatically include my signature… options and save changes, or choose More options > Insert signature while composing an email.
Hi,
Thanks for this service
It looks fine on your website but when I copy it the logo doesn’t appear in Office 365.
ANy thoughts on how I remedy this ?
Thanks
Hi Andy,
Thank you for mentioning you’ve run into a problem. Could you specify which template you are using and what is the image URL to the logo? Are other graphics (like social media icons) visible?
How can I use HTML for a signature using Outlook on the Web?
It always just shows the code as text instead of rendering the HTML.
There is no option for entering code or file. It is just a WYSIWYG editor,
Hi Mark,
Currently, there is no way to paste HTML code directly to the Outlook on the Web’s signature editor. If you have HTML code which is not rendered, you can save it in an HTML file, open the file in a browser, copy the signature and, finally, paste it into the signature editor.
I have added my photo as a thumbnail to my signature, but it is huge. I am trying to just delete it from my signature and can’t seem to make it go away. How do I delete or resize my photo in my signature?
Hi Jennifer,
You can (and should) use a graphics editor to crop and resize your photo before adding it to the signature. Generally, people are not happy when they get a 1MB+ sized emails just because there is a photo in the email signature. The next step is to add width and height parameters to your img element in HTML. If you are not familiar with HTML code, you can use our free email signature generator, which will take care of the formatting for you.
THANK YOUUUU
Made my life sooo much easier!
Hi, we have a shared mailbox The signatures are defined in both (outlook + owa) but in the Internet mail (owa) the signature is not saved correctly. Is it possible to overcome this? If so – how?
Do you mean the signature is not added to emails? Or that you get an error when you try to save the signature in OWA?
One way to make sure that the correct email signature is applied every time would be to add the signature on the server level. Then, it would not matter which email client you use to send emails. How to create company-wide email signatures and disclaimers in Office 365
I’m having trouble with OWA changing the size of the signature image. I have the images sized correctly, but when I add it by either pasting or inserting an image it gets very large and sometimes blurry. No matter how small I resize the image in an editing program OWA makes it huge in the signature box. I cannot resize within the signature box. Can you help me resolve this?
Hi Adrienne,
One way to resolve issues like that is to compose the signature in HTML with the right width and height tags and then copy the signature to OWA. You can use one of the signature templates from our free email signature generator to make this job easier.
I am having an issue with inserting my logo and my social media buttons. I am copying it from my desktop Outlook and pasting into my boss’ O365 version but it does not work, it just shows as strange boxes in that spot. I tried the “insert hyperlink” suggestion above but that does absolutely nothing. Any suggestions?
Hi Kathy,
The Insert hyperlink option will not help you with graphics – it is used to add hyperlinks. If you copy the signature from Outlook signature editor, you might want to try copying the signature from an actual email. If this does not work, simply use the Insert pictures inline option in the OWA signature editor to replace those strange boxes with actual pictures.
When changing email signature the chosen formatting such as bold/italics/colours are not showing despite them being saved in settings? How do I fix this?
To make sure I understand you correctly – in the signature editor, you can see all the formatting changes, whereas in the email message, you cannot? It might mean you are composing your messages in plain text format. Please check if there is the Switch to HTML option available under the More actions button.
Dear Sir
Kindly note that i make my signature from other web and now its make big problem for me , i cant delete there signature due its automatically shown and even i make new outlook email its also show ,
really i need your help , its make big problem to me with my boss
Could you explain what you mean by “the other web”? If you are using Outlook and there is a signature which shows automatically, you should be able to turn it off in the settings. Go to File > Options > Mail > Signatures and turn the problematic signature off. If it is in OWA, follow the path in the article above and unmark the options which automatically add the signature. If neither of those solutions works, please specify which email client you use.
How can I insert a banner with a link to an intranet/internet page in the signature in outlook365. Simply copying it is not working.
Thank you.
Hello Johan,
Do you mean that when you paste the banner it does not appear or that clicking the banner in a signature does not lead you to the page?
If there is no link on the banner, highlight the banner and click the Insert hyperlink button and enter the URL of your choice.
If the banner does not appear altogether, use the Insert picture option first, and then follow the step I mentioned above.
I followed these instructions and it looks great on my end when I start a new email. When someone gets the email the photos come up as gibberish text making the body of the email extremely long.
Thank you. This was very helpful.
How to make the social media linkage work If I just copy/paste your signature template to the web outlook?
Hi,
The easiest way would be to highlight a social icon the same way you would highlight a chunk of text. Then, click More > Insert hyperlink in the editor’s ribbon and insert links to the according social media profile. Repeat for the rest of icons and you are done. You can also use the email signature generator if the template you have chosen is also in the generator.
How do you create an email link and phone link if you’re using 365 Outlook for web?
Hi Tara,
To create a link, click the Add hyperlink button and in the field in which you normally paste an URL, type mailto:YourEmailAddress for an email link and tel:YourNumber for a phone link.
Is it possible to set up multiple email signatures because I can only seem to set up one
Hi Ross,
Outlook on the Web lets you set up only one email signature at a time. To set up more, you can connect your account to Outlook.
How would you connect your account to outlook? I need to have multiple signatures.
You can follow those steps to add your account to Outlook.
In Office 365 webmail, can I use an automatic signature only sometimes when I choose, rather than “always when replying” or “always when composing”?
Hi Michael,
You can add the signature only sometimes if you like. To do so, do not check any of the options you mentioned. Then, while composing an email, click the … symbol next to the discard button and choose Add a signature from the list. It is not automatic, but it will give you a chance to add the signature only when you want.
How do I include logo, that is “moving”. I have the signature in .html file
Hi Marie,
Do you mean an animated logo? If that is the case, add the logo the way you would add a standard picture. It is easiest done using the signature editor, like in the instructions above. Just click insert pictures inline and point to the location of your animated gif file.
What you said is correct Milena. I have the Windows 10 Mail app and adding images in the signature is not allowed. I don’t know why they removed such a nice feature.
How do I add a signature in Windows 10 mail programme Outlook?
Hi Göran,
To set up a signature in Windows 10 Mail app, follow the steps below:
1. In the Windows Mail app, go to Settings (the cog icon)>Options.
2. Then, go to the Signature section where you can compose your email signature. Make sure the Use an email signature option is ON.
3. Your signature should appear automatically while creating a new email message.
However, as far as I know, the signature editor in Windows 10 Mail app does not allow formatting or adding images.
Hope this helps!