In this article, you can find out how to set up your own server-level automatic email signature or disclaimer in Office 365. Like most of today’s email signature solutions, it supports HTML content such as tables, images and font formatting, but in contrast to e.g. Google Workspace (G Suite), it also allows for automatic personalization of individual signatures. However, there is no option to e.g. insert the signature directly below the latest reply/forward, or preview it in the user’s mailbox.
The following article describes how to set up a global email signature in Office 365. If you prefer the video format to the text-and-screenshot-based one, go to this blog post instead.
How to set up an email signature in Office 365
The steps below show how to set up a global email signature in the Exchange admin center (EAC).
Sign in to the Exchange admin center using an Exchange Online administrator account.
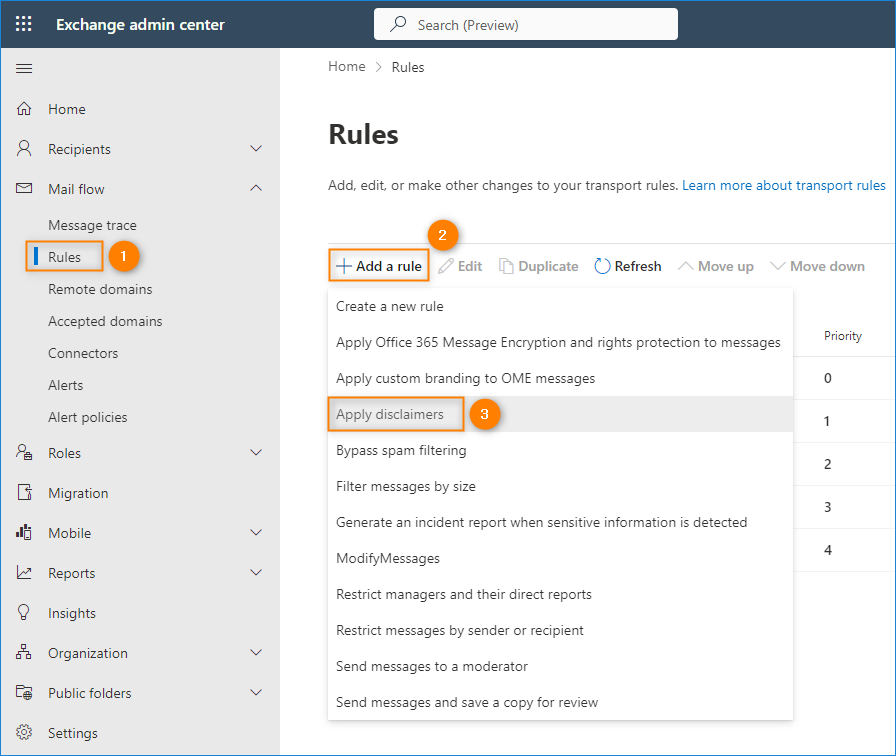
Go to Mail flow > Rules. Click Add a rule and select Apply disclaimers.
Note: When you select the Apply disclaimers action (instead of Create a new rule), the new rule creation wizard will open with the attributes already preselected.
Type the name of your rule and configure the settings according to your needs.
In the Apply this rule if section, select the conditions that will trigger the rule. You can find the list of available conditions in this Microsoft’s article.
In the Do the following section, the Apply a disclaimer to the message > append a disclaimer action should already be selected. If it is not, use the dropdown menu to select it (you also have the option to prepend the disclaimer).
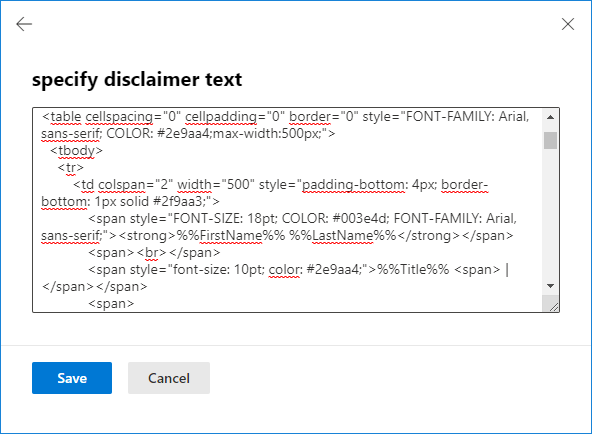
Now, you need to insert your signature into the Office 365 editor. The signature can be either plain text or HTML code. To add your signature, click the Enter text link and add the text or HTML code of your organization-wide email signature in the specify disclaimer text pane. Note: To personalize email signatures for your Office 365 users, you can add Exchange property variables such as First name, Last name, Phone number, etc. To add them to the signature, use the %%PropertyName%% pattern, for example %%FirstName%%. Then, such placeholder will be automatically replaced with the proper value for the user. You can find the complete list of accepted properties in this article.
Next, select the preferred fallback action, which will be executed in case of problems with inserting the signature. You can select Wrap (forward the original message as attachment and stamp the forward), Ignore (send the message without the signature) or Reject (don’t send the message).
Tip: You don’t have to be an HTML expert to create a professionally looking email signature. Feel free to use this email signature generator or download one of the templates available in our free email signature template library. Then, if needed edit it so that all the variables follow the %%PropertyName%% pattern and paste the signature HTML code into Office 365 signature editor.
Complete the remaining steps of the rule creation wizard. You can keep the default settings or adjust them to your needs (e.g. you can set up specific exceptions to your rule). For more information on these settings and the differences in rule processing based on message type, go to this article.
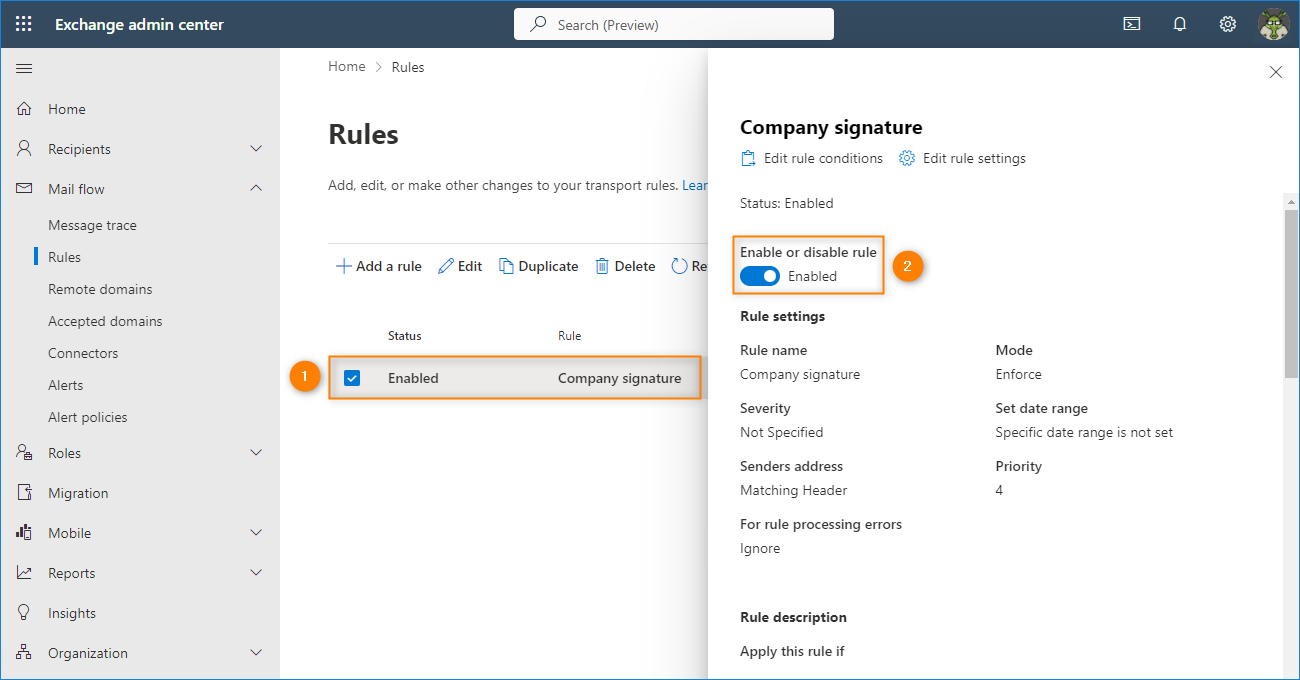
Click Finish to save the rule.
Once created, the mail flow rule is disabled by default. Select it from the rules list and use the toggle to enable the rule.
Send a test message to check if the signature works as expected.
That’s it! Your company-wide Office 365 email signature is ready to use.
Limitations of the native Office 365 solution
Unfortunately, there are several important functionalities you don’t get when using the built-in Office 365 email signature solution. Those include:
Inserting the signature directly under the latest email reply or forward.
Displaying server-side email signatures in the users’ Sent Items folders.
Displaying email signatures as you type an email.
Letting the users decide which email signature to use.
Delegating rights to manage email signatures to non-admin users (for example, to Marketing).
Embedding images in email signatures (not as attachments).
Skipping signature lines which contain blank spaces when variables can’t be updated (e.g. because the value wasn’t provided for a user).
To overcome those limitations and gain other capabilities, I recommend using a third-party solution like CodeTwo Email Signatures 365. It’s the best Microsoft 365 email signature management tool
You can also watch this video to learn about the product highlights:
Are you using Microsoft Teams? Advertised as “the ultimate messaging app for your organization”, in most cases it allows employees to communicate and collaborate with high efficiency. If you are using it as a primary means of communication, it is vital to direct your co-workers to this channel. So, is there an easy and efficient method to link to Teams? There is! The secret is to use the so-called deep links.
This is one of the several limitations of Microsoft 365 / Office 365 email signatures – Exchange Online does not provide a way to overcome this problem natively. Moreover, if you do not add an exception to your mail flow rule, you may experience your email signature being doubled. Currently, the only way to automatically add email signatures directly under replies or forwards is to use a third-party solution like CodeTwo Email Signatures 365.
Is it possible to add a hyperlink to a whole Depts signature blocks, and not the rest of the organisation? We have two depts dedicated to certain types of businesses and they need to have their dedicated websites under their names.
If so do you have the code information or can direct me?
Hi Julie, You can configure separate rules for different teams. Simply choose the right conditions, i.e. “The sender is a member of a group”. If you want to use a single mail flow rule and add different links depending on the user’s team, you could use a custom attribute, but it will be problematic if some users don’t have this custom attribute set up.
Apple mail has an option that blocks remote content, which means no images will be visible. For some time now, it also seems to block some images, even without this option turned on. I’m afraid there isn’t much that can be done to fix it, except from using embedded images added by third-party signature tools like CodeTwo Email Signatures for Office 365.
After applying the signature/disclaimer successfully the signature also shows lastly on emails received from non organisation emails, such as clients, gmail, outlook mails etc.
Hi, Do you mean that disclaimers are added to incoming emails? You can prevent this by choosing the right conditions (The sender is inside the organization). It’s worth remembering that the native disclaimer feature adds signatures to the bottom of any conversation. Take a look at other limitations of this method
Spot on with this write-up, I really think this website needs a great deal more attention. I’ll probably be returning to read through more, thanks for the information!
Hi, I am wondering if it is at all possible to link to html files within the disclaimer text? Within our company we have a digital team that manages updating the signatures (which there is a large subset of) and when we need to test them out, us admins individually upload/edit each one, if there are errors/incompatibility in the html this can be a long process of going back on forth with the digital team of changing and testing each one. What would be best is for us to store the html for a signature on a site somewhere they already have access to, and be able to include it server side though the html. I have tried the following but it seems the exchange server does not process the html content in anyway:
I know its not going to be possible to script it through js client side as most email clients rightfully so disable scripts from running, if there is someway to do this we could setup the linked html signature files and leave them to edit/test the signatures at there own leisure.
Hi Perry, What you are proposing is a wonderful idea. Unfortunately, I don’t see a way this could be achieved with the native methods. Like you mentioned, any scripts on the client side will be blocked by email clients or AV software, so that’s not going to work. You can; however, completely eliminate the need of back-and-forth communication between the digital team and IT with CodeTwo Email Signatures for Office 365. Once IT deploys this solution, managing signatures can be delegated to any other team. Read more at Delegation of signature management rights. CodeTwo Email Signatures for Office 365 has a fully-functional 14-day free trial, so you can test if it works well in your scenario.
This method applies the signatures on the server side, not in email clients, so no Outlook signatures will be automatically deleted or replaced. It means that there is a risk that multiple signatures will be added to an email. The best way to deal with local users’ signatures is to prevent Outlook from adding them. The article below shows how to do it: https://www.codetwo.com/kb/how-to-disable-adding-signatures-created-in-outlook-for-exchange-users/ Using the native method has some drawbacks. For example, users will not see the signature while they type their email or in their Sent Items folder, which might tempt them to add a signature manually. To deal with this problem and the other limitations, you would have to use an email signature management tool: CodeTwo Email Signatures for Office 365.
Hi, When sending a message, the footer is added correctly. Unfortunately, when replying to a mail message, the footer is added at the very end of the message. With a long conversation at the bottom, we have a dozen or so feet underneath. Is it possible to generate a footer right under the response content?
Hi Wojciech, Unfortunately, this is one of the limitations of this native method for setting up global email signatures. What is more, it is not the only limitation of Office 365 email signatures. To overcome those issues you will need a third-party email signature management tool – CodeTwo Email Signatures for Office 365
If I enter the HTML for an image in an extended attribute in AD and then put a tag to that attribute in the signature will the image show in the signature or will it show the HTML text?
Hi James, If you add the whole img element to an extensionAttribute, the mail flow rule will interpret it as HTML and add an image. You can also add an URL and use the placeholder inside the href attribute. The latter option, requires each user for whom the global disclaimer is applied to have a valid URL in the corresponding extension attribute. Mind that the macro for the first extension attribute would be %%customAttribute1%%.
Is there a way to see if it works without having admin rights? I am currently just at this company to help them with thing so i dont have access to the admin page on exchange online.
There is no way to perform administrative tasks in Exchange Online without admin rights. If you want to test the disclaimer feature in their environment – you need them to assign you admin rights or ask an admin to configure the disclaimer for/with you. If you want to see for yourself how it works and you do not have any access to an Office 365 tenant, you could try creating a test tenant. It includes a fully functional trial period.
The company-wide solution presented in this article is limited to Exchange Online users. For users who don’t have Office 365, you are limited to an individual, client-side approach.
Hello – really useful article and chat – thank you. Just for clarity – if we create a server side enterprise signature, and a user has a local personal signature – when the compose their message their personal signature will be seen/added, and when the message is actually sent the enterprise signature will also be added – so the recipient may see two signatures the personal one from the sender and the enterprise one – is that correct ?
Hello Mike, Yes, if users add their own email signature, the server signature will be added, as well. That is unless you create a keyword-based exception. The best way to prevent this problem is to inform the users not to insert their own signatures and, just in case, block personal signatures in OWA and Outlook. If you need instructions on how to achieve that, please refer to the articles below: How to prevent Outlook from adding signatures Disable OWA signatures
Hi Mothusi, It seems that the placeholders you use do not have the right format. For example, instead of using {First Name}, you should use %%FirstName%%. The table in this article can help you correct the placeholders’ format. You can also use our Free Signature Generator. If you choose Exchange Online as your platform, the generator can give you HTML code with the right placeholders, ready to paste into the mail flow rule.
Is there any way where original personalized signature will be overwritten by company wide signature? Issue is such that email not displaying 2 signatures personal and company wide.
Thank you for your feedback. I have no text in the signature, it is ony an image and a link to a website behind the image .
Can i use the link text as criteria so Outlook 365 does not add the image a second time ? I already tried a few things like “if mailbody contains this text” but it did not work, the image was added a second or a third time.
I try to add an image from our webserver as Signatur at the end of an email if recepient is an external user. This works fine.
When i now send an email to an external user, he answers me and i write back again, the image is added a second time to the end of the mail. So i have then two times the same image.
How can i configure the signatur that the image is only insert once in a dialog ?
Hi Thomas, This is the default behavior, but there is a way to change it. If your disclaimer includes some text, the solution is easy and rather effective. Edit the rule which adds a disclaimer, click more options and specify the rule should be applied Except if… The subject or body includes… the text from your disclaimer. If your rule adds only an image, you could add an exception if subject includes… “RE:”, but this is far from being foolproof.
Great article, but the solution doesn’t work for email sent from iPhones or iPads.
By default, iOS sends emails in plain text (unless the user applies some styling to the mail). This fails, because the html signature in the transport rule gets appended in plaintext – resulting in garbage.
How can I force Exchange to convert the message to html first (or avoid appending the signature to plaintext emails)? Can’t find a good option to force iOS html format either (less desirable).
Surely I can’t need a third party tool to have a usable signature in O365?!
I am afraid that this is one of the limitations the Office 365 signatures have. As of today, you do need a third party tool (like CodeTwo Email Signatures for Office 365) if you want to have a fully usable company-wide email signature.
Hi Pawel, I love office 365 but i think the problem with the signature is not a limitation, is a BUG! I pay for the office365 license and I must pay more if I want to use the signature feature correctly…
Hi Roberta, I am sorry you feel that way. I love Office 365, too. At the same time, like most products, it has some areas in which additional tools come in handy. The native signature feature offered in Office 365 may not be perfect, but still, many companies use it “as is.” Third party products help people who want more from this feature.
I created a rule, everything works fine. Though when I deleted the rule the rule still is being applied. Even when I edited the rule the original text keeps showing up. Any idea?
Can i exclude certain employee from the auto signature like if %% email %% = ‘Samual@company.com’ skip it. Or i have to create a new transport rule for that user only
Hi Fred, Yes, you can exclude one or more employees, or even a whole Active Directory Group. The easiest way to do this is to add them to the rule as an exception. Simply edit the rule and click “More options…” at the very bottom. Above, an option to “Add exception…” appears, click it, then choose “when the sender is this person” and choose the employee.
Because the office 365 is synchronized with our internal AD (without Azure AD) can we take the information such as : (phone number, mobile number, email and job title) and put in the signature automatically ?
Hi Ryan, I think you should be able to. Most MS synchronization tools like AAD Connect just keep your on-prem AD and Azure AD in sync. What tool are you using?
Yes I have tried that and is working , at the first time is not working , but somehow it is working now, thanks Pawel. But can I put URL image also in disclaimer ? ex : Because I have tried that but the images is didn’t show up, it just show with the mark “x” like broken images, I already make sure if I go to that link above the image is appear.
Hi. is there a way to define a company wide standard email for “automatic replies”? meaning…any employee turning on “Automatic replies” would activate a comany wide standard message….the only flex would be start date/end date Thanks – Fred
That’s an interesting idea – I will forward it to our developers.
In the meantime, check out CodeTwo Out of Office Manager: http://www.codetwo.com/out-of-office-manager/?sts=3955. This application lets you set a company-wide OOF standard, but all settings (including enabling/disabling and start/end dates) are on the administrator’s side.
Is it possible to have an embedded link in an image in the signature – i.e. the LinkedIn icon in the signature that is hyperlinked you my LinkedIn page?
To do that in your signature code, wrap an img tag containing your LinkedIn icon in a href tags like this: <a href="link_to_webpage"><img src="link_to _image"></a>.
Thanks Milena, this works, however, this adds the image/banner for every reply, duplicating/multiplying the image with every reply in the email trail. Any advise on how this could only be limited to just once?
I have been looking into exception rules but not working for me or I am not using it correct.
Once you have created your email signatures, simply select a preferred one while composing a new email message (Message or Insert tab>Include section>Signature).
When I receive an HTML email signature from Office 365 into my Outlook desktop email app, I have to ‘click to download’ the images in the signature. (I have “images turned off” for my email in Outlook). Is there a workaround for that?
How long does it take before a change of signature (Company wide on all e-mail message) is available/in use for the message’s send?
Already have outlook installed, executed the steps above, tested it no signature after 5 test’s closed outlook removed exchange account from outlook, installed exchange account in outlook and tested it again. It delivered me a signature.
I mentioned a type error so i adjusted this. Tested again new message to another e-mailaddress still gave me the wrong signature.
Hope you got an solutions or answer before i’ll set it up for the company.
Is there a way to automatically insert the intended recipients email address into the disclaimer?? what I mean is say I have %%Email%% for the sender, which will automatically insert the senders email, is there a variable for the intended recipient??
Hi Alexander, Are you positive there is a placeholder for the recipient’s email address? Just like Johnson stated, there is no problem with the sender’s address and other AD attributes, but I do not think there is a placeholder for any message properties.
when someone replies to an email who works in my company, their signature ends up showing up at the bottom of the email string below my signature for the initial email. Is there a setting that was missed?
No, this is correct behavior. Inserting email signatures only at the very top or bottom of email conversations is a limitation of the native Office 365 email signature mechanism (see the ‘Limitations of the native Office 365 solution’ section in my article). If you want to overcome it, you have to use e.g. CodeTwo Email Signatures: http://www.codetwo.com/email-signatures/?sts=3955
Actually there is a work around for this. Just update your disclaimer with exception where the portion of your disclaimer is specified as a part of subject or body.
Hi Paweł, does this company wide email signature only work when using Mail online with Office 365 or will the email signature also automatically appear in Outlook etc? I need a standardised but personalised email signature for all users whether they are working on Office 365 or Outlook.
The signature is added to emails on the server level, so it won’t appear in Outlook or any other email client when a user composes a message. But it will be added to messages regardless what client they are sent from (Office 365, Outlook, mobile devices, Mac, etc.).
If you want the signature to display in Office 365 OWA and Outlook when an email is being composed, you need a solution like the one I mention at the bottom of the article, CodeTwo Email Signatures: http://www.codetwo.com/email-signatures/?sts=3955
Is there a way to have the electronic signature that is visible on Office 365 e-mail (on my desktop computer) also be used on e-mails I send from my cell phone ? It is an HTC One android device.
Are you using the solution described in my article? If you are, the email signature should be added to all messages meeting the defined conditions, regardless where they are sent from (Outlook, OWA, mobile device, etc.).
This is not working for Outlook Mobile. It appears that outbound email by passes the Rule when sent from mobile.
Kamil Glaser says:
I’d check the conditions if the person is included in the rule so the disclaimer can be applied to them. Also, if an email is sent in plain text format, mail flow rules are unable to force HTML format on those emails. This might result in a broken signature.


how can i get the signature to be inserted at the end of the message?
regards,
Iván
This is one of the several limitations of Microsoft 365 / Office 365 email signatures – Exchange Online does not provide a way to overcome this problem natively. Moreover, if you do not add an exception to your mail flow rule, you may experience your email signature being doubled. Currently, the only way to automatically add email signatures directly under replies or forwards is to use a third-party solution like CodeTwo Email Signatures 365.
Hi
Is it possible to add a hyperlink to a whole Depts signature blocks, and not the rest of the organisation?
We have two depts dedicated to certain types of businesses and they need to have their dedicated websites under their names.
If so do you have the code information or can direct me?
Thanks
Hi Julie,
You can configure separate rules for different teams. Simply choose the right conditions, i.e. “The sender is a member of a group”. If you want to use a single mail flow rule and add different links depending on the user’s team, you could use a custom attribute, but it will be problematic if some users don’t have this custom attribute set up.
Hey,
Can we Insert the signature directly under the latest email reply or forward using Outlook’s Mail Flow rule?
Unfortunately, that’s one of it’s most notable limitations. It’s not the only one, though: List of mail flow signature limitations.
Is there a fix for signatures appearing on the recipient’s mobile device? Apple mail on the recipient’s device does not show the email signature.
Apple mail has an option that blocks remote content, which means no images will be visible. For some time now, it also seems to block some images, even without this option turned on. I’m afraid there isn’t much that can be done to fix it, except from using embedded images added by third-party signature tools like CodeTwo Email Signatures for Office 365.
I have been looking for those properties for ages,. thanks so much!!
Hi there,
Great post.
After applying the signature/disclaimer successfully the signature also shows lastly on emails received from non organisation emails, such as clients, gmail, outlook mails etc.
How can i prevent this?
Hi,
Do you mean that disclaimers are added to incoming emails? You can prevent this by choosing the right conditions (The sender is inside the organization).
It’s worth remembering that the native disclaimer feature adds signatures to the bottom of any conversation. Take a look at other limitations of this method
Another great post. Keep up the good work!
Spot on with this write-up, I really think this website needs a great deal more attention. I’ll probably be returning to read through more, thanks for the information!
Oh my goodness! An amazing article.
Hi, I am wondering if it is at all possible to link to html files within the disclaimer text? Within our company we have a digital team that manages updating the signatures (which there is a large subset of) and when we need to test them out, us admins individually upload/edit each one, if there are errors/incompatibility in the html this can be a long process of going back on forth with the digital team of changing and testing each one. What would be best is for us to store the html for a signature on a site somewhere they already have access to, and be able to include it server side though the html. I have tried the following but it seems the exchange server does not process the html content in anyway:
I know its not going to be possible to script it through js client side as most email clients rightfully so disable scripts from running, if there is someway to do this we could setup the linked html signature files and leave them to edit/test the signatures at there own leisure.
it would seem the page removed my html code, im trying to use html #include tags and php include
Hi Perry,
What you are proposing is a wonderful idea. Unfortunately, I don’t see a way this could be achieved with the native methods. Like you mentioned, any scripts on the client side will be blocked by email clients or AV software, so that’s not going to work.
You can; however, completely eliminate the need of back-and-forth communication between the digital team and IT with CodeTwo Email Signatures for Office 365. Once IT deploys this solution, managing signatures can be delegated to any other team. Read more at Delegation of signature management rights.
CodeTwo Email Signatures for Office 365 has a fully-functional 14-day free trial, so you can test if it works well in your scenario.
Hi,
If the Outlook client already have set with Signatures will this method replace it? Or it will just add another lines below the existing signatures?
This method applies the signatures on the server side, not in email clients, so no Outlook signatures will be automatically deleted or replaced. It means that there is a risk that multiple signatures will be added to an email. The best way to deal with local users’ signatures is to prevent Outlook from adding them. The article below shows how to do it:
https://www.codetwo.com/kb/how-to-disable-adding-signatures-created-in-outlook-for-exchange-users/
Using the native method has some drawbacks. For example, users will not see the signature while they type their email or in their Sent Items folder, which might tempt them to add a signature manually. To deal with this problem and the other limitations, you would have to use an email signature management tool: CodeTwo Email Signatures for Office 365.
Hi,
When sending a message, the footer is added correctly. Unfortunately, when replying to a mail message, the footer is added at the very end of the message. With a long conversation at the bottom, we have a dozen or so feet underneath. Is it possible to generate a footer right under the response content?
Hi Wojciech,
Unfortunately, this is one of the limitations of this native method for setting up global email signatures. What is more, it is not the only limitation of Office 365 email signatures. To overcome those issues you will need a third-party email signature management tool – CodeTwo Email Signatures for Office 365
If I enter the HTML for an image in an extended attribute in AD and then put a tag to that attribute in the signature will the image show in the signature or will it show the HTML text?
Hi James,
If you add the whole img element to an extensionAttribute, the mail flow rule will interpret it as HTML and add an image. You can also add an URL and use the placeholder inside the href attribute. The latter option, requires each user for whom the global disclaimer is applied to have a valid URL in the corresponding extension attribute. Mind that the macro for the first extension attribute would be %%customAttribute1%%.
Is there a way to see if it works without having admin rights?
I am currently just at this company to help them with thing so i dont have access to the admin page on exchange online.
There is no way to perform administrative tasks in Exchange Online without admin rights.
If you want to test the disclaimer feature in their environment – you need them to assign you admin rights or ask an admin to configure the disclaimer for/with you.
If you want to see for yourself how it works and you do not have any access to an Office 365 tenant, you could try creating a test tenant. It includes a fully functional trial period.
Hey, how about the web outlook users, which dont have office365? like hotmail, msn etc.
The company-wide solution presented in this article is limited to Exchange Online users. For users who don’t have Office 365, you are limited to an individual, client-side approach.
Hello – really useful article and chat – thank you.
Just for clarity – if we create a server side enterprise signature, and a user has a local personal signature – when the compose their message their personal signature will be seen/added, and when the message is actually sent the enterprise signature will also be added – so the recipient may see two signatures the personal one from the sender and the enterprise one – is that correct ?
Hello Mike,
Yes, if users add their own email signature, the server signature will be added, as well. That is unless you create a keyword-based exception.
The best way to prevent this problem is to inform the users not to insert their own signatures and, just in case, block personal signatures in OWA and Outlook. If you need instructions on how to achieve that, please refer to the articles below:
How to prevent Outlook from adding signatures
Disable OWA signatures
Hi Pawel,
I have created the signature transport rule in office365 but when i test it fails to add/apend my credentials. What could be the cause?
below is the response i get
{First name} {Last name}
{Title}
t: {Phone}
m: {Mobile}
e: {E-mail} {Company}
{Address 1}
{Address 2}
{Web page}
Hi Mothusi,
It seems that the placeholders you use do not have the right format. For example, instead of using {First Name}, you should use %%FirstName%%. The table in this article can help you correct the placeholders’ format.
You can also use our Free Signature Generator. If you choose Exchange Online as your platform, the generator can give you HTML code with the right placeholders, ready to paste into the mail flow rule.
Hi,
Is there any way where original personalized signature will be overwritten by company wide signature?
Issue is such that email not displaying 2 signatures personal and company wide.
Hi Mahesh,
You can prevent Outlook from adding email signatures and block users from editing their OWA signatures; however, this will not prevent users from adding signatures manually. You might also need to inform all users about the unified email signature and convince them not to add email signatures on their own.
Hi Kamil.
Thank you for your feedback.
I have no text in the signature, it is ony an image and a link to a website behind the image .
Can i use the link text as criteria so Outlook 365 does not add the image a second time ?
I already tried a few things like “if mailbody contains this text” but it did not work, the image was added a second or a third time.
Please try using this exception type: subject or body matches these text patterns… and then insert the link text or the name of the picture you add.
Hi all.
I try to add an image from our webserver as Signatur at the end of an email if recepient is an external user.
This works fine.
When i now send an email to an external user, he answers me and i write back again, the image is added a second time to the end of the mail. So i have then two times the same image.
How can i configure the signatur that the image is only insert once in a dialog ?
Thank you all for your help.
Hi Thomas,
This is the default behavior, but there is a way to change it. If your disclaimer includes some text, the solution is easy and rather effective. Edit the rule which adds a disclaimer, click more options and specify the rule should be applied Except if… The subject or body includes… the text from your disclaimer. If your rule adds only an image, you could add an exception if subject includes… “RE:”, but this is far from being foolproof.
Great article, but the solution doesn’t work for email sent from iPhones or iPads.
By default, iOS sends emails in plain text (unless the user applies some styling to the mail).
This fails, because the html signature in the transport rule gets appended in plaintext – resulting in garbage.
How can I force Exchange to convert the message to html first (or avoid appending the signature to plaintext emails)? Can’t find a good option to force iOS html format either (less desirable).
Surely I can’t need a third party tool to have a usable signature in O365?!
I am afraid that this is one of the limitations the Office 365 signatures have. As of today, you do need a third party tool (like CodeTwo Email Signatures for Office 365) if you want to have a fully usable company-wide email signature.
Hi Pawel,
I love office 365 but i think the problem with the signature is not a limitation, is a BUG! I pay for the office365 license and I must pay more if I want to use the signature feature correctly…
I’m sorry but I don’t appreciate this!
Hi Roberta,
I am sorry you feel that way. I love Office 365, too. At the same time, like most products, it has some areas in which additional tools come in handy. The native signature feature offered in Office 365 may not be perfect, but still, many companies use it “as is.” Third party products help people who want more from this feature.
I created a rule, everything works fine. Though when I deleted the rule the rule still is being applied. Even when I edited the rule the original text keeps showing up. Any idea?
Hi Scott, The first thing to check is if you have any other transport rules that may be causing the issue. Please connect to your Office 365 with PowerShell (as per this article: https://www.codetwo.com/admins-blog/how-to-connect-and-remotely-manage-office-365-with-powershell/?sts=3955) and run:
Get-TransportRule | select name,state,actionsand paste the result in this thread.
Can i exclude certain employee from the auto signature
like if %% email %% = ‘Samual@company.com’ skip it.
Or i have to create a new transport rule for that user only
Hi Fred,
Yes, you can exclude one or more employees, or even a whole Active Directory Group.
The easiest way to do this is to add them to the rule as an exception.
Simply edit the rule and click “More options…” at the very bottom.
Above, an option to “Add exception…” appears, click it, then choose “when the sender is this person” and choose the employee.
Can I use staff images to be pulled from office 365 user image?
Hi Aaron,
Not natively (see: https://technet.microsoft.com/en-us/library/jj919235(v=exchg.150).aspx#Anchor_1).
To do this, you would have to use CodeTwo Email Signatures for Office 365: http://www.codetwo.com/email-signatures/?sts=3955
Hi Pawel,
Because the office 365 is synchronized with our internal AD (without Azure AD) can we take the information such as : (phone number, mobile number, email and job title) and put in the signature automatically ?
Hi Ryan, I think you should be able to. Most MS synchronization tools like AAD Connect just keep your on-prem AD and Azure AD in sync. What tool are you using?
Hi Pawel,
Yes I have tried that and is working , at the first time is not working , but somehow it is working now, thanks Pawel.
But can I put URL image also in disclaimer ?
ex :
Because I have tried that but the images is didn’t show up, it just show with the mark “x” like broken images, I already make sure if I go to that link above the image is appear.
Hi Ryan, Can you confirm that you are adding the image using the
<IMG SRC>tag?Also, is the URL of the image publicly accessible (i.e. you can open it from outside of your organization)?
Finally, the problem could also be on the receiving client’s end. See this article: https://www.mail-signatures.com/articles/images-in-email-signatures-linked-or-embedded/?sts=3955
How can I select an image from my desktop to be included in the signature/disclaimer?
Hi Simon,
You can only do this using 3rd party software such as CodeTwo Email Signatures for Office 365: http://www.codetwo.com/email-signatures/?sts=3955
Without it, Office 365 only lets you use images that are already hosted on the web (in this article I refer to them as “linked” images: https://www.mail-signatures.com/articles/images-in-email-signatures-linked-or-embedded/?sts=3955)
Hi.
is there a way to define a company wide standard email for “automatic replies”?
meaning…any employee turning on “Automatic replies” would activate a comany wide standard message….the only flex would be start date/end date
Thanks – Fred
Hi Frederic,
That’s an interesting idea – I will forward it to our developers.
In the meantime, check out CodeTwo Out of Office Manager: http://www.codetwo.com/out-of-office-manager/?sts=3955. This application lets you set a company-wide OOF standard, but all settings (including enabling/disabling and start/end dates) are on the administrator’s side.
Is it possible to have an embedded link in an image in the signature – i.e. the LinkedIn icon in the signature that is hyperlinked you my LinkedIn page?
Hi Samuel,
Yes, you can hyperlink the LinkedIn icon.
To do that in your signature code, wrap an img tag containing your LinkedIn icon in a href tags like this:
<a href="link_to_webpage"><img src="link_to _image"></a>.Here is more info on the subject: https://www.mail-signatures.com/articles/add-social-media-button-email-signature/?sts=3955
Hope this helps,
Milena
Thanks Milena, this works, however, this adds the image/banner for every reply, duplicating/multiplying the image with every reply in the email trail. Any advise on how this could only be limited to just once?
I have been looking into exception rules but not working for me or I am not using it correct.
Hi Rabbani, This video demonstrates one of the ways you can achieve this: https://www.youtube.com/watch?v=ketoNsE-fZo&t=7s
hi- when i expand Admin I dont get the admin centre-exchange window as you.
i get- manage your organization
service settings
users groups
licenses
domains
service centre
support
website
message centre
setup
none of which have any links to what this instruction advises-
Can you please assist?
Hi Jen,
You can also try to access the Exchange admin center from the Admin tab located at the top-right corner of the Office 365 admin center: https://technet.microsoft.com/en-us/library/jj200743(v=exchg.150).
Can you see this option?
Milena
Hi Jen, What Office 365 plan do you own?
Is there a way to add more than one signature to an email account, and be able to use which ever signature i need at the time?
Hello Lori,
As far as I know, it is not possible to use many email signatures in Office 365.
However, if you use Microsoft Outlook (a desktop version), then you could create more than just one email signature for your email account.
This article explains how to create email signatures in Outlook 2013/2010 (Fig. 5 and 6): https://www.mail-signatures.com/articles/how-to-create-or-modify-an-email-signature-in-outlook-2010-and-2013/?sts=3955.
Once you have created your email signatures, simply select a preferred one while composing a new email message (Message or Insert tab>Include section>Signature).
Hope this helps!
Milena
Thanks a lot, I appreciate it!
When I receive an HTML email signature from Office 365 into my Outlook desktop email app, I have to ‘click to download’ the images in the signature. (I have “images turned off” for my email in Outlook). Is there a workaround for that?
Thanks –
Melissa
Hi Melissa,
Try adding the Office 365 address to the Safe Senders List in your Outlook. See this article for details: https://support.office.com/en-us/article/Change-whether-pictures-in-messages-are-automatically-downloaded-020abc02-4876-47fa-9cb1-2b4543154311?ui=en-US&rs=en-US&ad=US
Hi,
How long does it take before a change of signature (Company wide on all e-mail message) is available/in use for the message’s send?
Already have outlook installed, executed the steps above, tested it no signature after 5 test’s closed outlook removed exchange account from outlook, installed exchange account in outlook and tested it again. It delivered me a signature.
I mentioned a type error so i adjusted this. Tested again new message to another e-mailaddress still gave me the wrong signature.
Hope you got an solutions or answer before i’ll set it up for the company.
Hi Rutger,
Office 365 mail flow rules should start working immediately when enabled. If they don’t or you are noticing other issues, you may want to contact Microsoft support: https://support.office.com/en-us/article/Contact-Office-365-for-business-support-Admin-Help-32a17ca7-6fa0-4870-8a8d-e25ba4ccfd4b
Hi Pawel
Is there a way to automatically insert the intended recipients email address into the disclaimer?? what I mean is say I have %%Email%% for the sender, which will automatically insert the senders email, is there a variable for the intended recipient??
Hi Johnson,
It’s not possible natively in Office 365. But you can do this using CodeTwo Email Signatures for Office 365: http://www.codetwo.com/email-signatures/beta-signup?sts=3955
Yes, I have done this successfully by simply entering the field into the code from the following list:
https://docs.microsoft.com/en-us/Exchange/policy-and-compliance/mail-flow-rules/conditions-and-exceptions#PropertyTypes
I suggest using an html editor like Dreamweaver to render your code properly.
Hi Alexander,
Are you positive there is a placeholder for the recipient’s email address? Just like Johnson stated, there is no problem with the sender’s address and other AD attributes, but I do not think there is a placeholder for any message properties.
when someone replies to an email who works in my company, their signature ends up showing up at the bottom of the email string below my signature for the initial email. Is there a setting that was missed?
Hi Darren,
No, this is correct behavior. Inserting email signatures only at the very top or bottom of email conversations is a limitation of the native Office 365 email signature mechanism (see the ‘Limitations of the native Office 365 solution’ section in my article). If you want to overcome it, you have to use e.g. CodeTwo Email Signatures: http://www.codetwo.com/email-signatures/?sts=3955
Best regards,
Pawel
Hello,
Actually there is a work around for this. Just update your disclaimer with exception where the portion of your disclaimer is specified as a part of subject or body.
Kind regards,
Hi Yuriy, Can you give more details on this workaround?
Watch 1:55 of https://www.youtube.com/watch?v=sikndwzF5Io
I think he is referring to a solution similar to this
Bump Would like to see an example.
Hi Paweł, does this company wide email signature only work when using Mail online with Office 365 or will the email signature also automatically appear in Outlook etc? I need a standardised but personalised email signature for all users whether they are working on Office 365 or Outlook.
Hi Richard,
The signature is added to emails on the server level, so it won’t appear in Outlook or any other email client when a user composes a message. But it will be added to messages regardless what client they are sent from (Office 365, Outlook, mobile devices, Mac, etc.).
If you want the signature to display in Office 365 OWA and Outlook when an email is being composed, you need a solution like the one I mention at the bottom of the article, CodeTwo Email Signatures: http://www.codetwo.com/email-signatures/?sts=3955
Hope this helps,
Pawel
Is there a way to have the electronic signature that is visible on Office 365 e-mail (on my desktop computer) also be used on e-mails I send from my cell phone ? It is an HTC One android device.
Hi Jeff,
Are you using the solution described in my article? If you are, the email signature should be added to all messages meeting the defined conditions, regardless where they are sent from (Outlook, OWA, mobile device, etc.).
Best regards,
Pawel
This is not working for Outlook Mobile. It appears that outbound email by passes the Rule when sent from mobile.
I’d check the conditions if the person is included in the rule so the disclaimer can be applied to them. Also, if an email is sent in plain text format, mail flow rules are unable to force HTML format on those emails. This might result in a broken signature.